Negative Lab Pro extends the metadata capability of Lightroom to enable film-specific metadata. This is something film photographers have been asking to have for a long time! If you already use Lightroom’s metadata engine, then this should be an easy process to add. But in case you’re just getting started, let’s talk about the basics of metadata and how/why to use it.
Why Add Film Metadata
How to Add Film Metadata
Using Film Metadata in Lightroom
Exporting Film Metadata
Metadata Field Guide
WHY ADD FILM METADATA
- Better Record Keeping - The metadata is a record of key information that is attached to each shot. It immediately answers questions in the future, like “which lens did I use here?” or “did I push this film during development?” Without proper metadata, it’s hard to keep a record of everything, and often users will try things like wacky file names (“2020-02-03-hasseblad-80mm-portra-400-pushed-2-noritsu-linear.jpeg”) or have complicated spreadsheets. It’s much easier (and faster) to use metadata to keep a good record of key facts for each capture.
- Better, Faster Organization - In Lightroom, having good metadata also makes it easy to organize your photos more effectively. For instance, if you want to view all your Kodak Portra shots in one places vs all Fuji 400h shots, that’s really easy to do with dynamic collections and metadata in Lightroom.
- Better Sharing - When you go to share your work (on Flickr, for instance), you’ll probably also want to include some information about each shot. This is where metadata comes in. By having the metadata attached to each image, Flickr will have everything it needs to include things like captions and keywords to each image.
NOTE: You can use the film metadata tool across your entire archive of film photos - not just images processed by Negative Lab Pro. So if you have negatives which you had previously scanned without Negative Lab Pro, or your have slide film in your collection, the metadata feature will still work.
HOW TO ADD FILM METADATA
To add film metadata in Lightroom:
- In Lightroom, go to the “Library” module (you can hit G on your keyboard to get there)
- Select the image or images you want to add metadata to
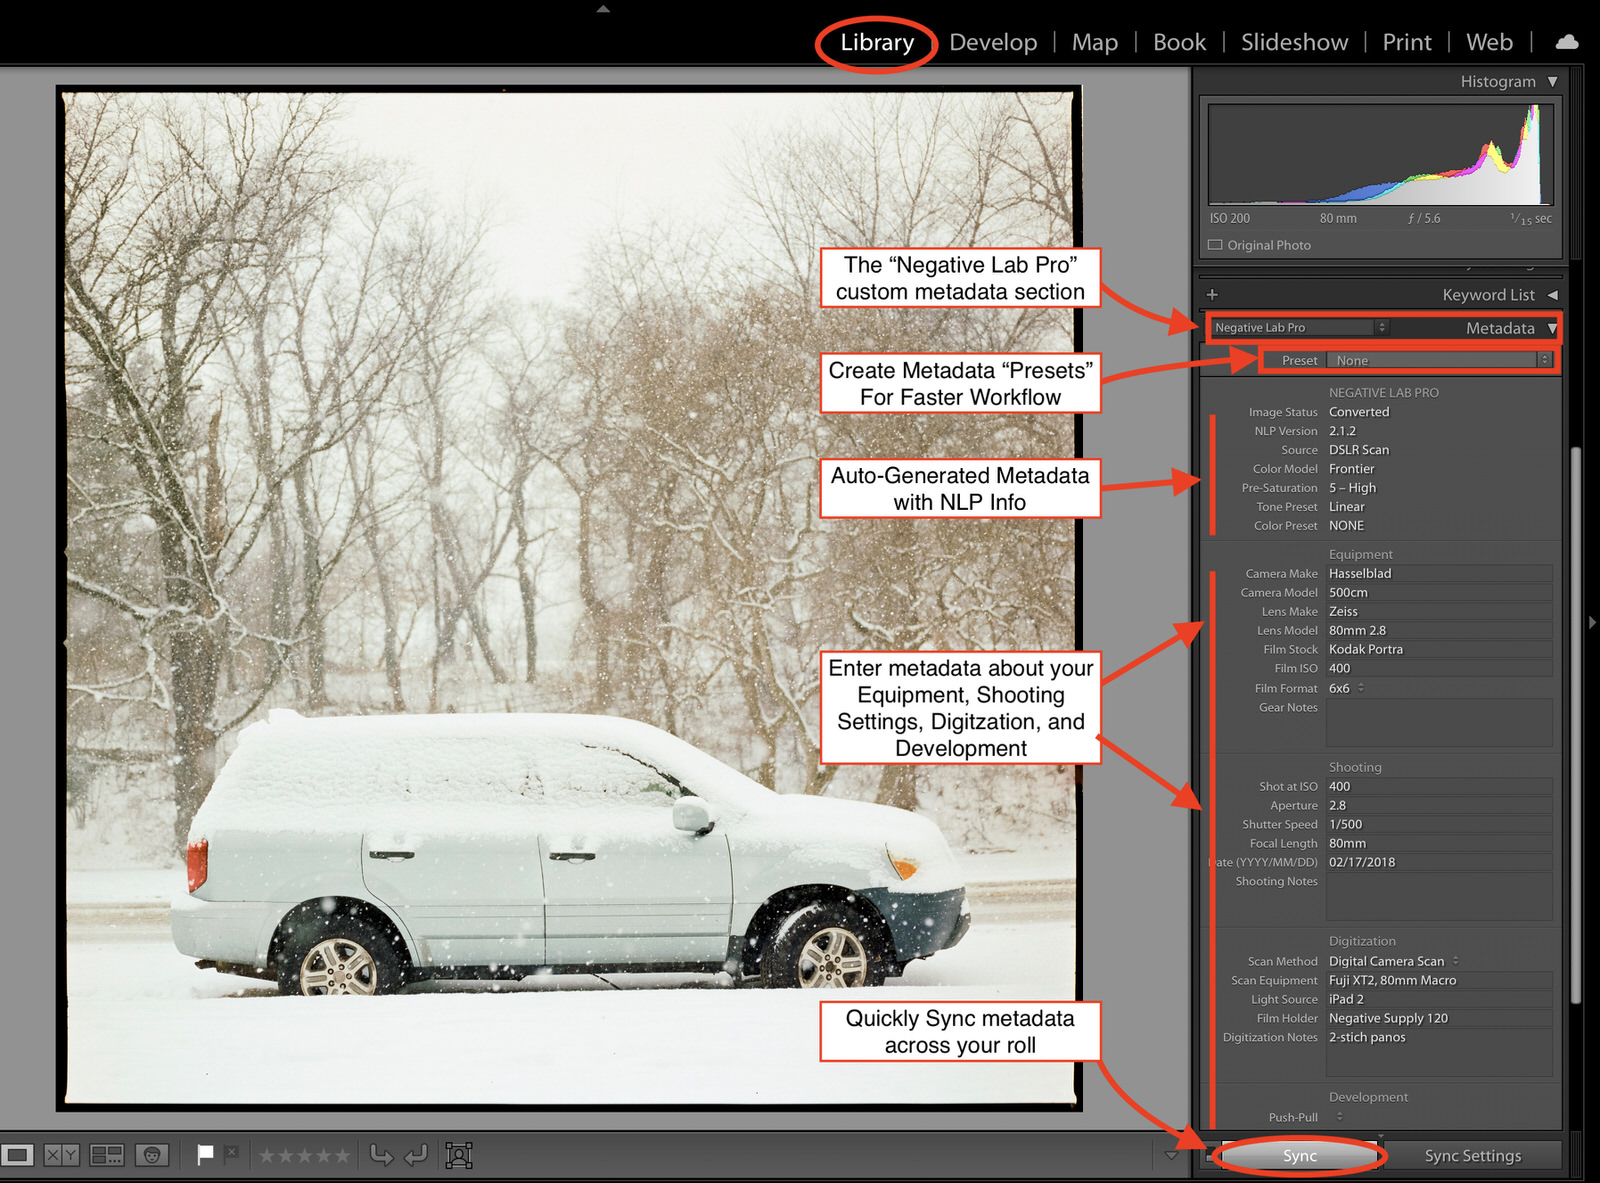
- In the right-side, find the “metadata” section, and change the dropdown to “Negative Lab Pro”.
- The first section is automatically populated when you use Negative Lab Pro, and shows information about which version of Negative Lab Pro you used on the image and some basic settings applied.
- The remaining sections (Equipment, Shooting, Digitization and Development) are ready for you to fill in! You don’t need to fill in everything. Just add the things that you want to be able to remember, sort, or share.
Lightroom also has a number of tools that make the process of adding metadata fast and painless!
- Auto Complete - you’ll notice after using the tool on a few images that Lightroom will start autocompleting the fields for you as you begin to type.
- Metadata Presets - you can create a metadata preset out of any combination of fields you want. So for instance, I often use a Hasselblad 500cm with 80mm Zeiss lens. I can fill in all the fields associated with that (Camera Make, Camera Model, Lens Make, Lens Model, Film Format, and Focal Length), and then click “Preset > Edit Presets” (right underneath the main “metadata” tab). This will bring me to a dialog where I can select the fields I want to be included in the preset, and then I can save as a new preset. Now, in the future, I can just apply this preset to the images I want without having to enter it manually.
- Syncing Metadata - Just like you can sync settings in Lightroom, you can also sync metadata. Let’s say you’ve just imported a new roll and start adding metadata to just one of the images. It’s likely that most of the metadata fields will be accurate for the entire roll. So, with your key image already selected, now select the rest of your images as well, and hit the “sync metadata” button at the bottom right. You’ll then have a chance to chose exactly which fields to bring over to the rest of the roll.
USING FILM METADATA IN LIGHTROOM
There are a number of different ways to use film metadata in Lightroom after you’ve added it. This definitely isn’t meant to be an exhaustive list, but just provide a few examples.
Using Library Filters
Library filters are great to quickly sort through your work.
Let’s say you want to quickly see all the images you’ve taken with a particular camera/lens combo. In this case, let’s say it’s a Hasselblad 500cm and 80mm lens.
- In the library module, make sure the “filter” bar is showing. You can toggle it on and off by using the \ key
- On the filter bar, select “metadata” to show the metadata filter
- From here, you can select which fields to filter your images. For this example, I’ll click the first dropdown item and change it from “Date” to “Camera Model” field from the bottom section of the list (all the Negative Lab Pro fields are in that final bottom section). It should then show a list of all the custom camera models I’ve added, and I can select the “500cm” model from the list to see just those images.
- Now, in the next filter box, I’ll change it to “Lens Model” (again from the bottom section of Negative Lab Pro metadata). Now it will show me all the lens models I’ve used with my Hasselblad 500cm, and I can select the 80mm lens to refine my selection.
- I can further refine this if I want in the final two metadata filter boxes, using any of the regular metadata or Negative Lab Pro custom metadata
Using Smart Collections
Smart Collections are another great way to use Negative Lab Pro’s metadata.
- In the library module, find the “Collections” tab on the left
- Hit the + to the right of Collections, and select Create Smart Collection.
- Set your name to “🎞️ Kodak Portra”
- Change the first dropdown from “rating” to “Film Stock” > Contains > Portra"
- If you want, you can create additional rules by hitting the + symbol to the right of the first rule. This will create another rule field. So for instance, if you wanted to see just your favorite Portra shots, you can add a rule to only include 5-star ratings in the group.
- Hit “Create”
- If you want, you can then create additional collections for other film stocks you use.
Not only with this add every image with “Portra” metadata into that collection, but as you add new images into your library and add metadata to them, it will automatically add those images into the correct collection.
And of course, this isn’t just for film stocks… you can create smart collections off of any metadata field or combinations of metadata fields.
EXPORTING FILM METADATA
It’s great to be able to view and sort your library based on the film metadata you’ve added, but that’s just half the fun. The real magic comes when you begin to export your images to other platforms, and make use of Negative Lab Pro’s metadata export engine.
As mentioned earlier, the custom Negative Lab Pro metadata is held in a separate container from the existing metadata on your image. One reason it does this to preserve some of the crucial details that Lightroom needs to process your image. But it also does this to give you more options on exactly how to share your metadata when you’re ready to share your work with the world.
How to export with film metadata written:
- Select the image(s) to export, and go to “File > Export”
- In the export dialog, you should see a “Negative Lab Pro” group of presets on the left side. Let’s try “NLP - For Flickr” - not only does this have optimized image settings, but also includes a new set of options on dealing with metadata
- The first section is “Negative Lab Pro | Metadata” - here, it has already selected to “Write EXIF Fields with Custom Metadata”. This will overwrite the standard exif fields settings with the information you’ve entered in the Negative Lab Pro metadata section. It also has “Automatically Generate Keywords” selected, which will create keywords based on the metadata you’ve added. In this case, it does not select “Retain Custom LR Metadata” - this setting is really only useful if you want to make a positive copy and retain the info in the NLP metadata section for future editing. (This setting also only works when LR is set to immediately reimport the image, as it does when creating positive copies).
- The next section is the “Negative Lab Pro | Auto-Caption” section. The caption is one of the most important and dynamic fields in the metadata, and is useful for conveying information about the your analog shots which do not have standard fields available.
- You can use this auto-caption section to generate incredibly rich captions. You can choose which information to include (Analog Equipment Info, Scanning/Digitization Info, and Film Development info), if you want to append to an existing caption you have on the image, what separator to use, and if you want to copy the generated caption to your clipboard (useful for sharing to services which do not natively support metadata).
- In addition to the Negative Lab Pro sections, you can also edit the regular export options, and then hit “Export”
Once you’re comfortable with this, you can do this much faster.
Just right-click an image (or group of images), select “export”, and then select “NLP - For Flickr” (or whichever export preset you want to use)
Now, when you go to upload those images to Flickr (or other sites that support metadata), your dynamic caption and film metadata will show up!
Many online platforms and services (like Flickr or Wordpress) look for specific, standard metadata fields to use when you add images. Negative Lab Pro writes to these standards. This metadata not only provides valuable information to anyone viewing your image, but also helps people discover your work. Other social platforms, like Facebook and Instagram, strip out the metadata from image uploads. In this case, the metadata itself does not get directly shared, however, you can copy/paste from the caption, or simply go back and look at the original metadata, to share this information about your shot when metadata does not get passed through
METADATA FIELD GUIDE
While many of the new metadata fields are self-explanatory, this section serves to document each available field.
The custom metadata fields expect specific formats of input. Because Negative Lab Pro is using fields from your metadata input to write to standard EXIF fields and generate auto-captions during export, it’s important that you follow these input guidelines.
Some of the custom fields will later be exported to standard EXIF tags, and others will be used in Auto-Caption. During export of an image, you’ll have a lot of control of how you want the metadata to be used. There are quite a few “standardized” metadata fields that NLP can write to (like your camera model, for instance). But other fields do not have a direct equivalent (for instance, the film you use). In this case, you can have Negative Lab Pro auto-caption your image with the details that won’t fit into standard metadata.
The custom film metadata is also broken into 6 distinct sections. This is useful during export because you can choose which sections you want to include in the auto-generated caption.
1. NLP SETTINGS
This first section is auto-generated when you use Negative Lab Pro and contains useful information about Negative Lab Pro and your settings. (If you haven’t used Negative Lab Pro on the image, this section will be left blank, which is perfectly OK).
| Field | Description | Auto Caption? | EXIF Output? | Format | Example |
| Image Status | The conversion status of the image - useful for sorting | Text | "Converted", "Positive Copy" or blank | ||
|---|---|---|---|---|---|
| NLP Version | The version of NLP used for the latest conversion | Y | Number | 2.2 | |
| Source | The scan source, as you've indicated during conversion Negative Lab Pro | Text | DLSR Scan | ||
| Color Model | The color model used during conversion | Y | Text | Basic | |
| Pre-Saturation | The pre-saturation level used during conversion | Y | Number | 5 | |
| Tone Profile | The tone-profile currently used during editing | Y | Text | Cinematic - Rich | |
| White Balance | The white-balance dropdown setting | Y | Dropdown | Auto-Warm | |
| LUT | The enhanced LUT selected during editing | Y | Text | Pakon |
NOTES:
- If you have this section set to AutoCaption during export, here’s what the above example would translate to: “Negative Lab Pro v2.2 | Color Model: Basic | Pre-Sat: 5 | Tone Profile: Cinematic - Rich | WB: Auto-Warm | LUT: Pakon”
2. EQUIPMENT
The Equipment Section is a place to share information about the film equipment you used to originally capture the image, for instance, the camera, lens and film you used
| Field | Description | Auto Caption? | EXIF Output? | Format | Example |
| Camera Make | The manufacturer of your analog camera | Y | Y | Text | Hasselblad |
|---|---|---|---|---|---|
| Camera Model | The model name of your analog camera | Y | Y | Text | 500cm |
| Lens Make | The manufacturer of your analog lens | Y | Y | Text | Zeiss |
| Lens Model | The model of your analog lens | Y | Y | Text | 80mm 2.4 |
| Film Stock | The film used on this shot | Y | Y | Text | Kodak Portra |
| Film ISO | The given ISO rating of your film | Y | Y | Number | 400 |
| Film Format | The physical format of this film | Y | Dropdown | 35mm | |
| Gear Notes | Any additional notes on your camera gear | Text Box | First roll with this camera |
NOTES:
- If you have this section set to AutoCaption during export, here’s what the above example would translate to: “Hasselblad 500cm | Zeiss 80mm 2.4 | Kodak Portra 400”
- If you indicate in the “shooting” section below that your “Shot At ISO” was actually 800, then the auto-caption will automatically change to: “Hasselblad 500cm | Zeiss 80mm 2.4 | Kodak Portra 400 @ 800”
- If you then indicate in the “development” section that you pushed your film +1 during development, the caption would then automatically change to: “Hasselblad 500cm | Zeiss 80mm 2.4 | Kodak Portra 400 @ 800, +1 dev”
3. SHOOTING
The Shooting Section is a place to share information about how and when this specific image was originally shot.
| Field | Description | Auto Caption? | EXIF Output? | Format | Example |
| Shot at ISO | How you rated your film during shooting. For instance, if you shot Portra 400 by rated it at 800 during shooting, add 800 here. Leave blank if you shot at box speed. | Y | Number | 800 | |
|---|---|---|---|---|---|
| Aperture | The aperture used for the shot. Leave blank if unknown. | Y | Number | 2.8 | |
| Shutter Speed | The shutter speed of the shot. Leave blank if unkown. | Y | Number/Fraction | 1/32 | |
| Focal Length | The focal length used on the shot. | Y | Length in mm | 80mm | |
| Date | The date this shot was taken | Y | YYYY/MM/DD | 2020/07/04 | |
| Shooting Notes | Any additional notes on shooting | Text Box | Low light conditions. May have underexposed. |
NOTES:
- Don’t worry if you haven’t recorded this information during shooting (I typically don’t). Just fill in the information you have.
- Also, it’s good practice to include the focal length used here, even if working with a fixed lens. For instance, even though I’ve shot with the Zeiss 80mm 2.8 lens in this example, I still indicate that the focal length used was 80mm. During export, Negative Lab Pro will use this focal length, along with the film format you indicated in the “equipment” section, to calculate and populate the ‘35mm Equivalent Focal Length’ EXIF tag. Pretty cool.
4. DIGITIZATION
The Digitization Section is a place to share information about how this film was scanned. This is especially useful if you are trying out different setups, or if your collection has a mix of ways it was digitized (for instance, if you also want to organize lab scans or scans done which did not use Negative Lab Pro in the process).
| Field | Description | Auto Caption? | EXIF Output? | Format | Example |
| Scan Method | How this image was scanned | Y | Dropdown | Digital Camera Scan | |
|---|---|---|---|---|---|
| Scan Equipment | The equipment you used to scan | Y | Text | Fuji XT2 + 80mm Macro | |
| Light Source | For digital camera scanning. The light source used to illuminate the negative. | Y | Text | Skier CopyBox 3 | |
| Film Holder | The method used to hold film in place. | Y | Text | Negative Supply 120 | |
| Digitization Notes | Any other notes on digitization | Text | Trying out new mask |
NOTES:
- In the above example, the auto-caption would be: “Digitized with Fuji XT2 + 80mm Macro | Skier CopyBox 3 | Negative Supply 120”
5. DEVELOPMENT
The Development Section is a place to include details about how the film was developed. This is particularly useful if you are developing your own film at home.
| Field | Description | Auto Caption? | EXIF Output? | Format | Example |
| Push-Pull | Was this negative pushed or pulled during chemical development | Y | Dropdown | +1 | |
|---|---|---|---|---|---|
| Developed At | Was this photo developed at a lab or at home? | Y | Dropdown | Home | |
| Developer | The chemical developers used during development. Leave blank if unknown. | Y | Text | Kodak HC-110 | |
| Dilution | The dilution of the chemical developer. | Y | Text | 1+30 | |
| Dev Time / Temp | Notes on time and temp used during development | Y | Text | 5 minutes at 68.0F | |
| Dev Method | Notes on any specific methods used during development | Text | 60s agitation followed by 10s every minute | ||
| Dev Notes | Any additional notes you want to provide on development | Y | Text | Chems may have been too old |
NOTES:
- In the above example, the auto-caption would be: “Home Developed in Kodak HC-110 1+30 | 5 minutes at 68.0F”
NOTE: the film metadata we're adding at this stage is non-destructive to your original metadata. It's important that this isn't overwriting your existing metadata at this stage. Otherwise, Lightroom could misinterpret your file. For instance, if you are digitizing with a digital camera, it's important on the RAW that Lightroom has the actual camera and lens info from your digital camera so it knows how to interpret the RAW. If you overwrote this with analog data at this stage, it would actually mess up your file. So everything at this stage is added in parallel to the original data, and then you can choose if and how to overwrite into standard fields when you make your final export