For Negative Lab Pro to work properly, it’s important that you have good, evenly-lit, properly-exposed scans of your negative film. The input must be good for the output to be good.
Digital Camera Scanning
Vuescan RAW DNGs
Silverfast RAW DNGs
Basic TIFF Scans
Digital Camera Scanning
Scanning your film negatives with a digital camera can be an incredibly rewarding – or incredibly frustrating – process, largely depending on your setup and know-how.
While DSLR (or Mirrorless) film scanning holds many promising results – like RAW capture, faster capture times, and sharpness that rivals $10,000+ drum scanners – there are many potential stumbling blocks along the way that could prevent you from getting the results you want from your film negatives.
Equipment
Having the right equipment plays a key role in getting great results with digital camera scans! There are 4 basics components to a good DSLR film scanning setup…
1. LENS
The lens is an incredibly important part of the DSLR/Mirrorless scanning process. Not only will a good macro lens produce great edge-to-edge sharpness of your negative scan, but it will also prevent some of the most common issues with DSLR scanning, like orange blotches resulting from lens flare during capture.
-
Use a modern macro lens if possible. Not only will a modern macro lens produce sharper results, but the newer AR coatings decrease the chance of lens flare during capture (lens flare can lead to strange colors and casts).
-
Use a “native” lens if possible (and avoid adaptors and tubes). Every adaptor or tube adds to the likelihood of light variances that will throw off the color (which may not be visible during capture, but will be amplified by the conversion). Adaptors can also throw off lens corrections that are performed later in software.
-
Longer focal lengths are preferable to shorter focal lengths. They allow you to keep the lens further from the negative, thus reducing the likelihood of lens reflections.
2. LIGHT SOURCE
The colors from your DSLR scan will only be as good as the light source that you use. Poor light sources will not be able to bring out the rich, natural colors in your negative. Poor light sources can also cause uneven lighting in your scan, which not only throws off the tonal balance, but will create uneven color reproduction.
-
Look for a light with a high CRI (Color Rendering Index) of at least 90+. If the manufacturer does not list the CRI, it is a warning sign that it is not a good light source for DSLR film scanning.
-
Look for an even lighting source - high-quality light pads made specifically for camera scanning should provide even illumination. If you are using a pixelated source (like an iPad) you’ll need to raise the film higher off the surface or use a diffuser (like opalized glass) to even out the light. If you are using a flash as a light source, special care will need to be taken to ensure even diffused light.
-
It’s generally recommended to use a daylight balanced light source with a temperature of 5000°K or 5500°K - you certainly don’t want your light to be any warmer than this!
See recommended light sources for more.
3. TRIPOD / COPY-STAND
You’ll need a way to keep your camera stationary and in plane with your film. You’ll want to look for a solution that is easy to finely adjust, as well as being sturdy enough to remain fixed in place for an entire session of film digitization.
-
A sturdy copy-stand with an adjustable height is the ideal solution. They are significantly easier to adjust than a tripod, are more stable, and more ergonomic to use while sitting at your desk.
-
In a pinch, you can use a traditional tripod. The sturdiest way to use a tripod is to invert the center column and shoot straight down.
-
An alternative to copy-stands and tripods is using a bellows or digitization adaptor (see this example). The advantage of this setup is that it keeps everything in plane and stray light out. The disadvantage is that this method is not as flexible for working with different film formats, or switching between lenses.
4. FILM HOLDERS/CARRIERS
Now that you have a lens, light source and stand, you need a way to safely elevate and transport your film for each shot. The important considerations are 1) film flatness, 2) speed, 3) limiting contact with film.
-
Use a film carrier that elevates the film off the surface of your light pad. Placing the film directly on the light table can lead to newton-rings, and will exacerbate any small variances in light.
-
Flatness is crucial to getting edge-to-edge sharpness across the entire frame - the depth of field of macro lenses is incredibly sensitive, so look for a film holder/carrier that has built-in mechanisms to keep the film flat.
AVOIDING DUST
One of the most annoying aspects of digital camera scanning is the need to remove dust. Unlike traditional film scanners, there is no separate IR channel capture with digital cameras, making IR dust removal not possible. The best solution is to prevent dust from being on your film in the first place!
-
Wear lint-free gloves whenever handling film - this will prevent oil from your skin and finger-print smudges from getting on the film.
-
Use a “rocket blaster” or anti-static dust removing brush directly prior to scanning. Since camera scanning doesn’t have IR dust removal, it will save you a lot of time to avoid dust in the first place. If using a rocket blaster, be sure to blast across both sides of the film, and blow the dust off the film rather than just pushing the dust to another part of the film.
CAPTURE PROCESS & SETTINGS
Now that you have all your equipment together, it’s time to check your setup! A proper setup is crucial, because even with great equipment, a small mistake in your setup can lead to frustrating results.
The basic setup process looks like this:
-
Make sure to mask at ALL the stray light from your light source. It doesn’t need to be fancy. Some dark construction paper with a mask cut out will do. This includes masking out the light that is passing through sprocket holes, although you may be able to get away with it if you have a modern macro lens setup.
-
Use a mirror to get the camera perfectly parallel to the film - place the mirror on the surface of the light pad. Then align your camera so that the reflection of the lens is exactly centered. See example of using mirror for alignment here.
-
Turn off all the lights in the room before capture.
-
Use your lens hood if you have one - to reduce flare potential.
-
Take off any lens filters (like UV filters), as this can be a source of unwanted reflections.
-
Shoot with the emulsion (matte) side of film facing towards the camera if you can (it’s less reflective and less likely to catch the light reflecting back from your camera/lens). You can then just flip the image during editing later.
-
Use a remote trigger or camera countdown timer during capture. The vibration caused by pressing the shutter button can cause blur in the capture.
Once you’re all set up, it’s important to consider the camera settings you use for capture.
CAMERA SETTINGS:
-
Shoot RAW - You don’t want to capture as a TIFF or JPEG because these will have a lot of settings built in that are intended for regular digital positive capture (and will result in distorted colors and tones when you invert the negative).
-
ISO: Set to your camera’s base ISO. This will vary a bit by camera, but is usually 100 or 200 ISO.
-
APERTURE: Set to f/8.0. This will minimize lens vignetting. Any lens vignetting that occurs during capture will be reversed during the inversion of the negative. It can also throw off the color balance along the outer edges of the capture.
-
SHUTTER SPEED: Set to your camera meter’s recommendation, or 1-stop higher - You may find some small improvements by exposing about 1-stop higher than your camera recommends, as this will result in slightly more “levels” of information being captured from the denser parts of the negative (You can read more about “exposing to the right” here).
-
Keep the SAME exposure for the entire roll. This will cut down on variance during processing. Beware auto exposure, as the small settings changes throughout the roll will create unwanted variance.
-
White Balance - since you are capturing RAW, the white balance won’t matter at this stage.
-
If your camera supports it, use “focus peaking” with LiveView and focus manually - otherwise, use AutoFocus on each shot. With focus peaking, you should be able to see that the film grain is in focus. If your camera does not have focus peaking and liveview, set it to AutoFocus, but be aware that there could be variations in your sharpness from frame to frame.
That’s it for camera scanning best practices! There certainly is more work necessary to get everything set up properly with a camera setup, but once you do, the workflow is much faster than a traditional scanner, and the results can be incredible.
Want RAW digital camera “scans” to play around with? You can download my DSLR scans here.
Vuescan RAW DNGs
Both Vuescan and Silverfast are capable of creating RAW DNG files. Negative Lab Pro includes unique RAW Profiles made just for these type of files.
These RAW DNGs are generally better to use (vs regular tiff files) for a number of reasons:
- It gives us better control over how the orange mask is neutralized. The reason for this is that the raw profile can act directly on the linear data in XYZ color space. Basically, this allows us to control how the white balance “color multipliers” are applied, which means better colors in the inverted Negative Scan.
- They are more versatile for future updates. Already there have been a few generations of improvements to the profiles.
- They are easier to create consistently. For instance, you don’t have to worry about color profiles.
The process for creating a RAW DNG file in Vuescan is as follows:
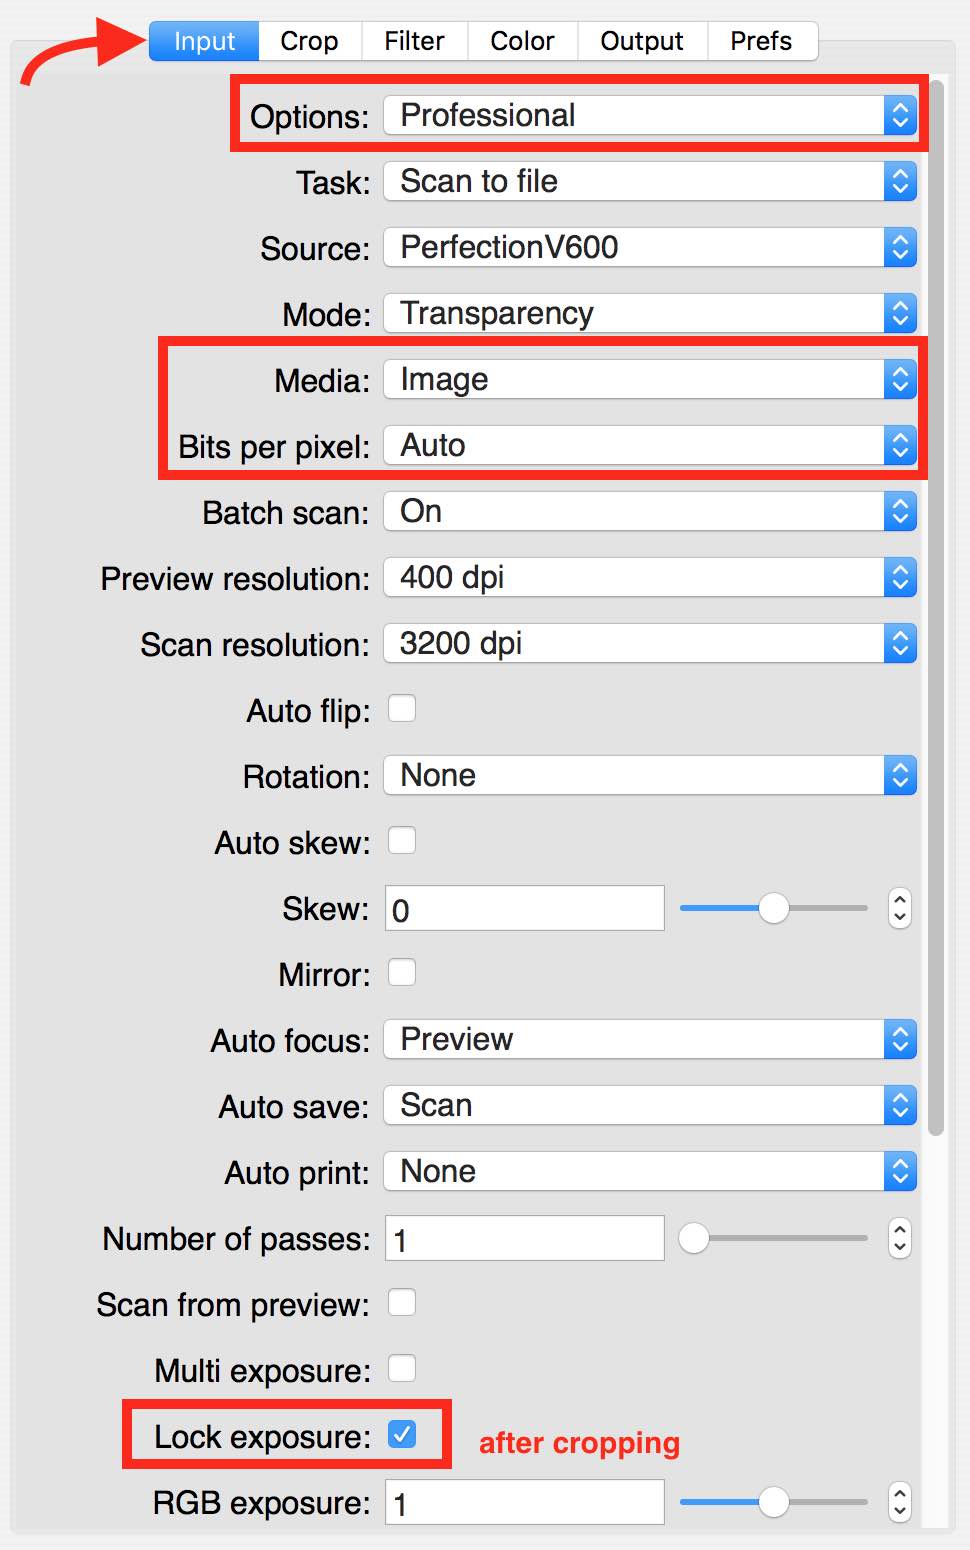
1. Set Vuescan Input Settings
- If using a flatbed scanner, set the mode to “transparency”. If using a dedicated film scanner, use whatever mode is listed.
- Set “Media” to “Image”
- Preview the image if you haven’t already done so
- Crop to show the exposed image (and a small amount of the film border if possible), then hit the “lock exposure” button. NOTE: You should only need to lock exposure once per roll. The reason for doing this is you want a consistent exposure for all your scans. Otherwise, small variances in auto-exposure could create issues later, particularly if using the “sync scene” function of Negative Lab Pro.

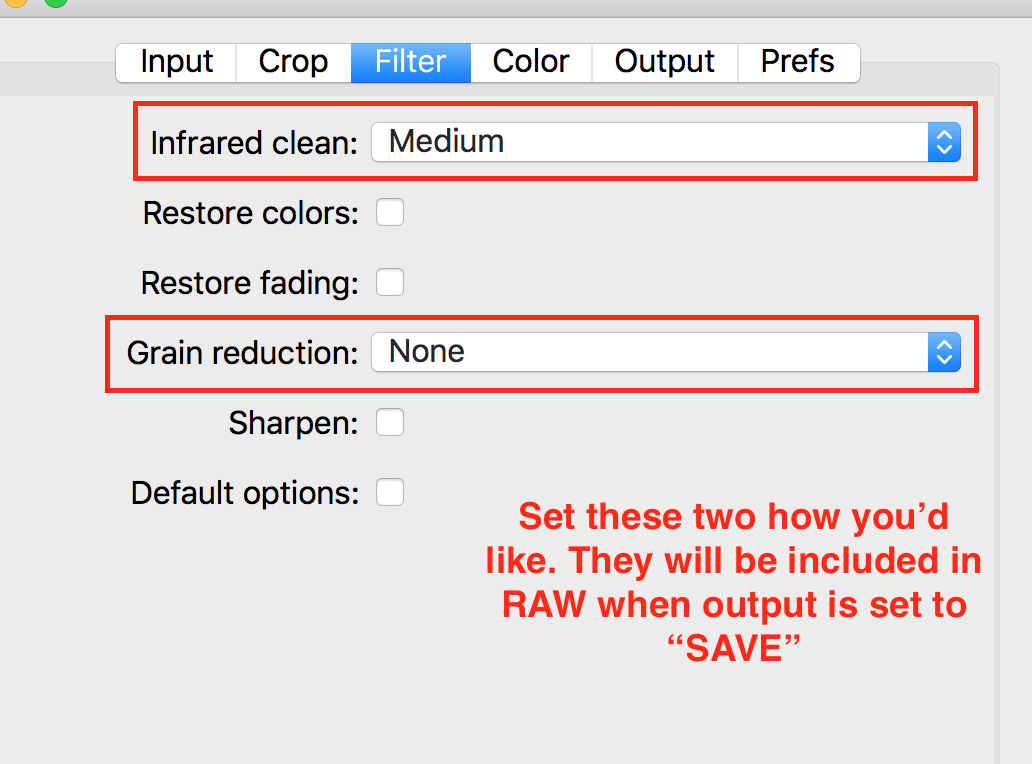
2. Set Vuescan Filter Settings
If you’d like to (and your scanner is capable of it), you can include infrared cleaning in your RAW DNG file. You can also set grain reduction. Other settings will not have an impact on your RAW DNG.

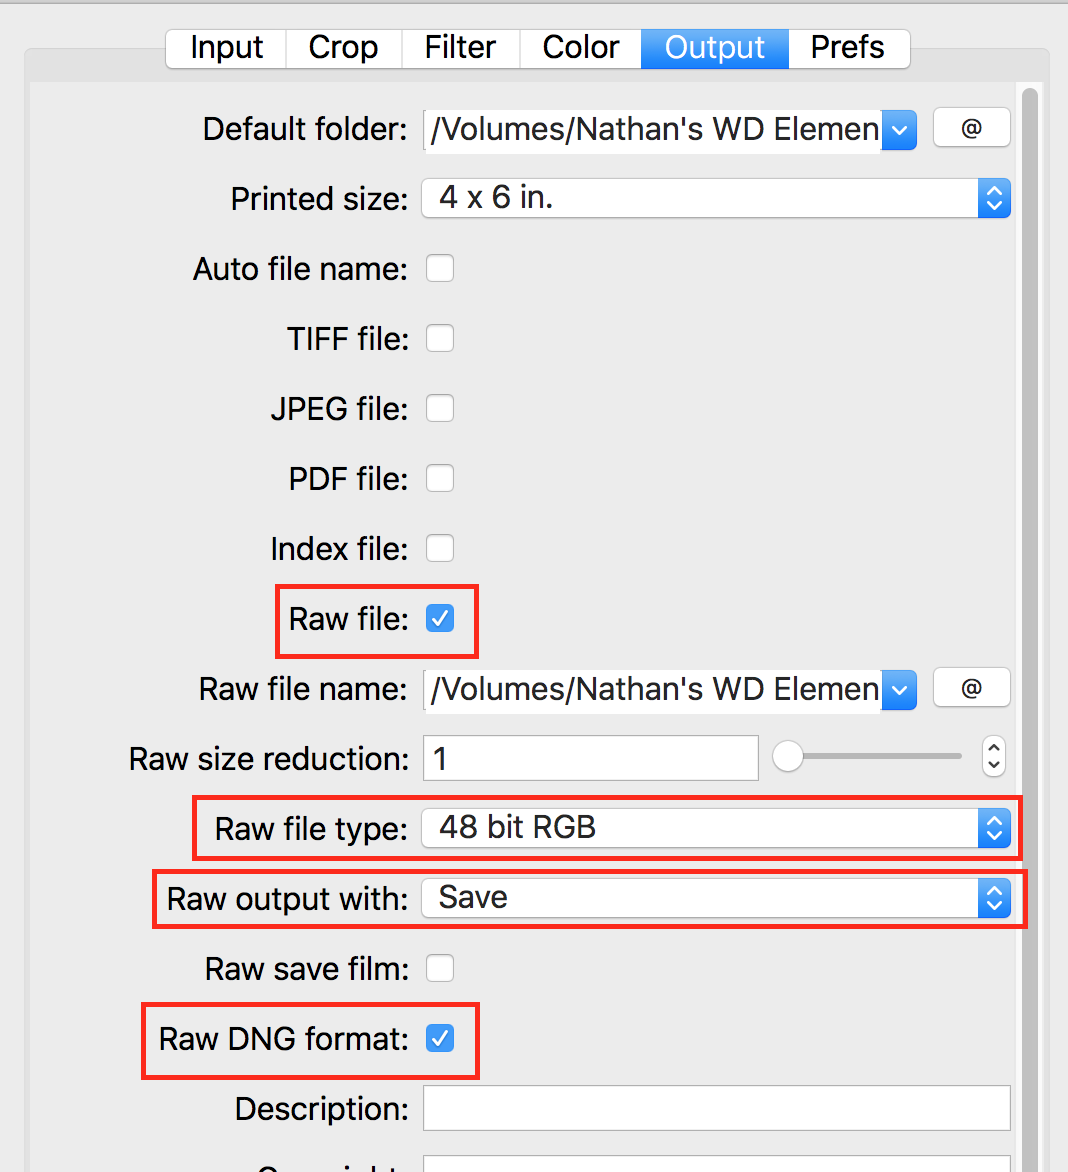
3. Set Vuescan Output Settings
- Make sure “Raw file” is the only file type selected
- Set the “Raw file type” to 48 bit RGB (do this even if your image is black and white)
- Set “Raw output with” to “Save” (this will allow for IR cleaning to work, if you’ve enabled it)
- Select “Raw DNG format”

NOTE: Do NOT set the raw file type to 64 bit RGBi - Lightroom won’t be able to interpret the 16-bit IR channel. Because you have “RAW Output with” set to “Save”, the 48bit RGB output will already include the dust removal from Vuescan.
RAW Scan Profile Support
In most cases, Negative Lab Pro should support your raw DNG file directly, just as it does with most camera scans. However, in some cases, you may need to run a small utility to adjust the metadata of this scan to enable support. You only need to do this if you see a warning in Lightroom that your Camera Profile is not supported. (You would see this warning in the Develop module of Lightroom on the right-hand side shortly after initially opening Negative Lab Pro on your scan.)
If you get the message that the Camera Profile is not supported, please take the following steps:
-
Import your RAW DNG file into Lightroom.
-
After import, select all the files, and go to “file > plugin-in extras > Update Vuescan/Silverfast DNGs” - then follow any instructions it gives you.
-
If step 2 has gone correctly, you should see the profile in Lightroom showing as “Negative Lab v2.1”, and there should NOT be any kind of profile warnings.
-
In some versions of Lightroom, you may still see the warning. In this case, simply shut down and restart Lightroom to force it to recognize the metadata changes.
Silverfast RAW DNGs
The recommended workflow for Silverfast is to scan as 48-bit HDR DNGs. This will enable us to use special, dual-illuminant profiles in Lightroom made just for SilverFast negative conversions, and not have to worry about gamma conversions.
- Set SilverFast to scan in “positive” mode (so that it doesn’t invert your negative).
- Scan as “48-bit HDR” and save as DNG file (depending on your version, this may be done different ways… at least in SF 8.8, I believe you need to go to preferences and check “HDR raw”).
Basic TIFF Scans
The directions for proper TIFF scans will vary a bit by scanning software, but here are some tips to keep in mind.
General Scan Instructions:
- Scan at gamma 1.8 or 2.2. – If you scan at gamma 1.0, you will need to use the “Tiff Prep Utility” to prepare the tiff for use in Lightroom).
- Scan as 48bit TIFF (i.e. 16-bit per channel) – You’ll need that bit-depth when we go to edit.
- Scan as if it were a Positive Image – Most scanning software will give you the option to scan in “negative” mode, or just scan a regular image. You want to tell the software that this is just a regular image, so that it doesn’t try to do the inversion itself.
- Turn off any color adjustments – You want to have a pure representation of the data in your scan.
I’ve also made some more detailed instructions for working with a few different kinds of scanning software: