Speeding Up Lightroom
Sharpening and Noise Reduction
Non-Destructive Cropping
Texture
HSL Color Panel
Lens Correction
Guided Upright Tool
Spot Removal
Graduated Filters
Pano Merges
Enhance Details
The Book Module
Other Plugins
Positive Copy Tips and Tricks
SPEEDING UP LIGHTROOM
Lightroom is a complex program, working with hundreds or thousands of large images at once. All of this can make it a bit… sluggish. But with a few tips, you can definitely speed things up!
- Optimize the Catalog – This makes a HUGE difference for me. Go to Lightroom > Catalog Settings and set it to “Back up catalog: Once a day, when exiting Lightroom.” Then, if things get sluggish, just close Lightroom, backup the catalog, then restart. I can’t recommend this enough.
- Use Negative Lab Pro in the DEVELOP module – The edits will update considerably faster when you are using Negative Lab Pro in the Develop module. (Updates will happen slower in the Library module)
- Use the latest version of Lightroom Classic – They recently made some big improvements, including better use of graphics processors, so I highly recommend this over LR 6 if you are able to make the switch.
- Close Other Programs when using Lightroom – Self-explanatory, but if you have Photoshop, Illustrator, and 20 tabs of Chrome open, it just isn’t going to be fast!
- Make sure your Hard Drive is at least 20% free space – You’ll see a big drop in speed if it isn’t because Lightroom uses the hard-drive to write cache while operating.
There’s more tips from Adobe on speeding up Lightroom here, but the above suggestions are what has made the most difference in my workflow.
SHARPENING and NOISE REDUCTION

While Negative Lab Pro includes its own sharpening module, many users prefer to adjust the sharpening and noise reduction themselves using Lightroom’s excellent details panel. (In fact, the default of Negative Lab Pro is to leave sharpening alone since so many users prefer to adjust it themselves.)
Most RAW workflow experts will recommend a three-step sharpening process.
- Input / Pre-Sharpening - That’s what happens inside this details panel.
- Creative Sharpening - Based on your image, you may want to add sharpening that brings out specific elements or textures. In Lightroom, you could adjust “Texture” or “Clarity”, or you could add a mask to just add texture, clarity, or sharpness to specific parts of your image.
- Output sharpening happens when you export your file or send it to the printer, and is optimized to the final dimensions of your output.
This “input sharpening” is especially necessary when working with DSLR scanning. The process of converting the digital camera’s sensor data into pixels usually leaves some softness. Adding the right amount of pre-sharpening can bring back that natural sharpness. But you don’t want to add too much at this stage because if you over-sharpen now (while it is at the full resolution) you’ll get some very unpleasant results when you export to smaller dimensions (for instance, if you want to share your work on Instagram).
The second step will just depend on your image. I do find that adding or removing “texture” can be helpful to try.
In terms of “output sharpening”, you have a few options. 1) You could use Lightroom’s output sharpening during export. 2) You could export to another program, like Photoshop, and use an “unsharp mask” or “smart sharpening” filter. Or 3) You could use a custom unsharp mask during export in Lightroom, using a plugin like “LR/Mogrify 2.”
Of these, I prefer to use a custom “unsharp sharpening” filter during export with LR/Mogrify 2. It speeds up my workflow and it gives me better sharpening control on output than I would normally get from Lightroom.
NON-DESTRUCTIVE CROPPING
This may seem a bit obvious, but if you are coming over from Photoshop, the idea of non-destructive cropping is a game-changer. You can crop and recrop as much as you’d like without losing any of the original image. Lightroom also has some handy cropping tools. You can use the “angle” tool to drag across a straight line, and Lightroom will adjust the crop for you to make it straight. You can also set the aspect ratio of your crop to get a specific crop format, or to ensure consistency across frames.
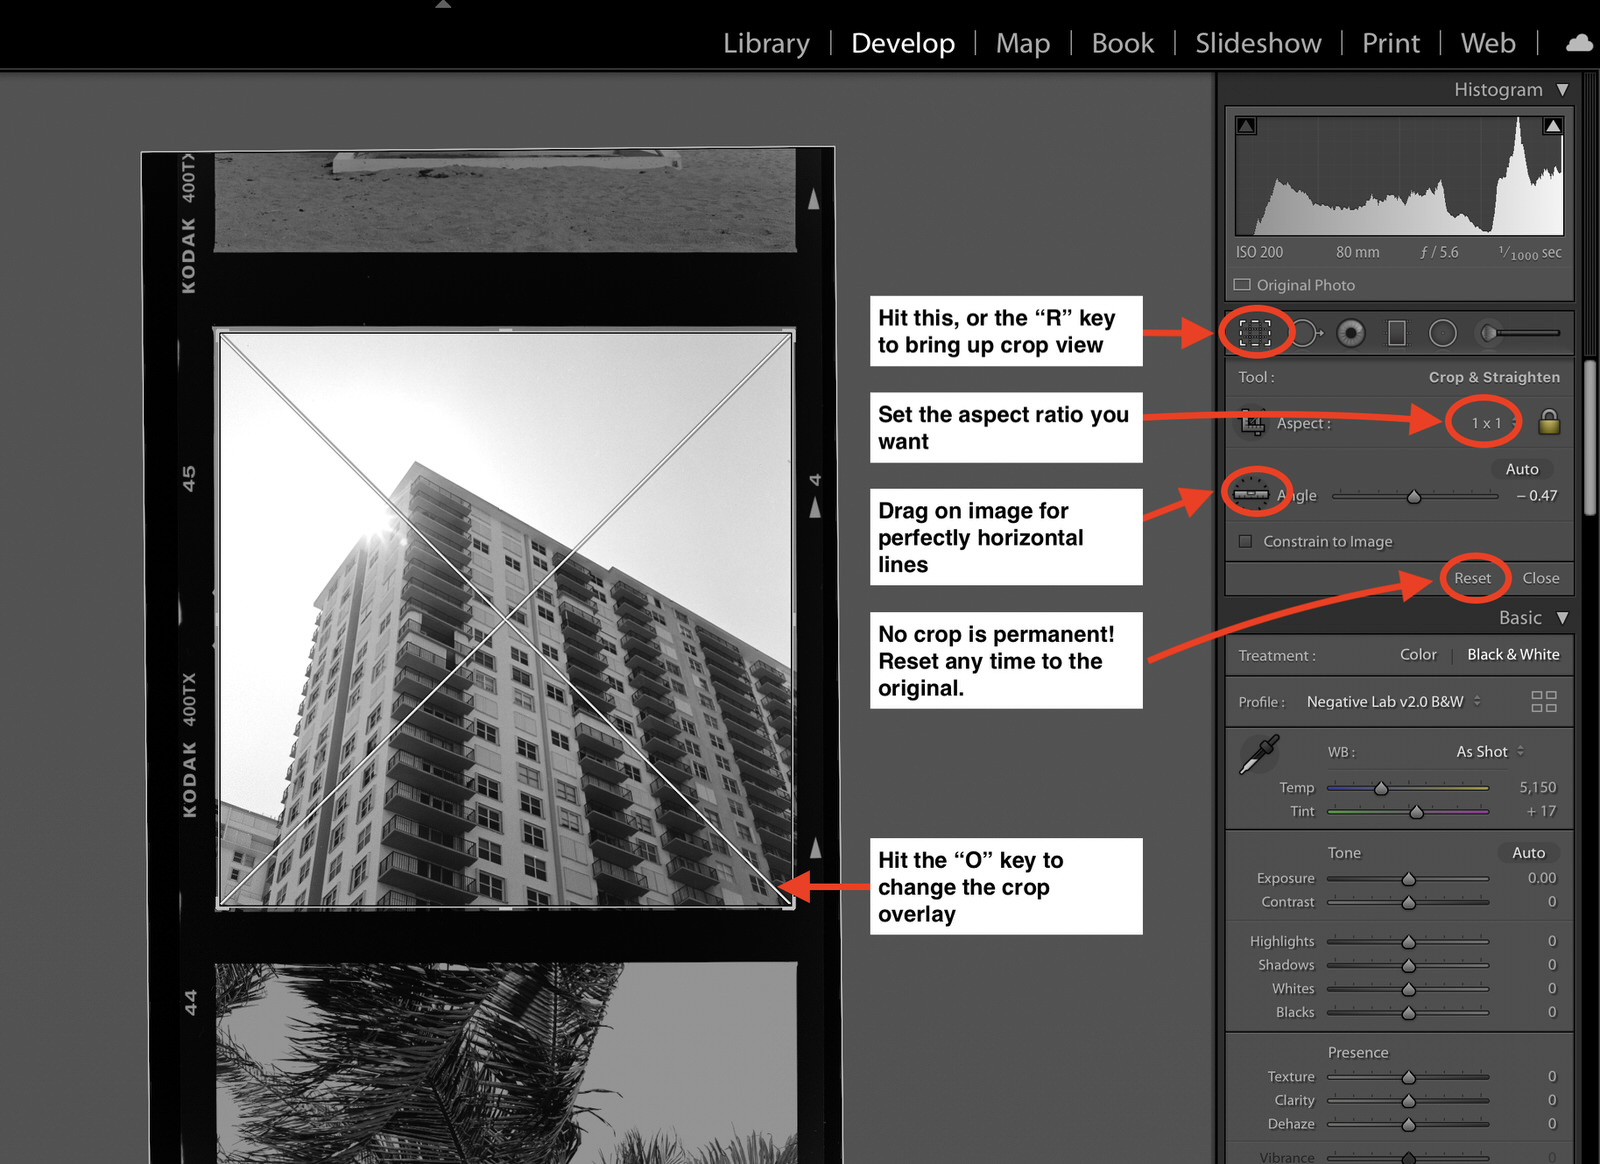
Cropping Tips:
- Use the “R” key to quickly bring up cropping
- Use the “O” to cycle between crop overlays
- Use the “Aspect” control to set an exact crop ratio
- Hit “Reset” if you want to return to your images full crop
- You can easily sync the same crop across multiple images. Just select additional images, hit “sync”, then select just “Crop”
TEXTURE
The Texture slider in Lightroom is remarkable, and it works great on the original negative. In many cases, I think adding a bit of texture looks MORE like the kind of sharpening used in Lab scanners than the sharpening controls in the details panel. You can also use this in combination with the local adjustments (like graduated filers), for instance, if you want to increase the texture in most areas of the image, but want to lower texture to soften skin tones or make smoother looking skies.

LEFT: No texture added. RIGHT: Texture +25 in Lightroom. A lot of times, I find that adding a bit of texture adds more of the "3D" feeling associated with a lab scanner.
HSL/Color Panel
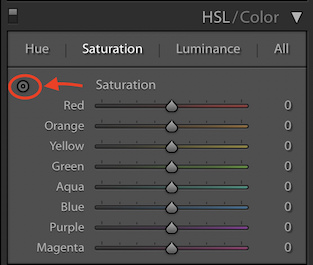
You can still use the HSL/Color panel on the original image to get some great nuances in color, BUT you have to follow this secret: use the picker tool and drag on the image itself (rather than trying to adjust the color slider individually). The reason for this is that if you are still working against the RAW, you need to be selected the colors in the original, and not in the inverted image. And using the picker tool will do this for you. If I find that any particular colors are too strong, I’ll just drag on that color in the image and pull it down.
Lens Correction
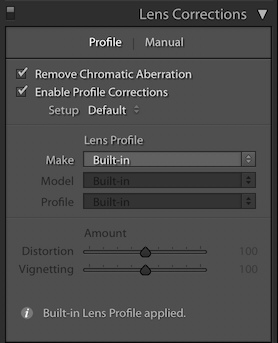
While Negative Lab Pro will automatically try to use the automatic lens correction tool, it can be helpful to come in and check and update the settings. This is especially important if you are using any kind of lens adapter in your camera scanning setup, as the adapter will typically prevent the camera lens metadata from being captured by your camera, and thus prevent Lightroom from finding the right lens profile automatically. So in that case, you might need to manually add your lens in this tool and find the right settings to remove distortion and vignetting. This is also a helpful tool for removing chromatic aberration from your scene.
GUIDED UPRIGHT TOOL
Shortcut: Shift+T
For digital camera scanning setups, the “guided upright” tool is incredible for making sure your Camera Scans are perfectly parallel! Just drag the tool along the borders of your image, and it will ensure they are perfectly parallel.
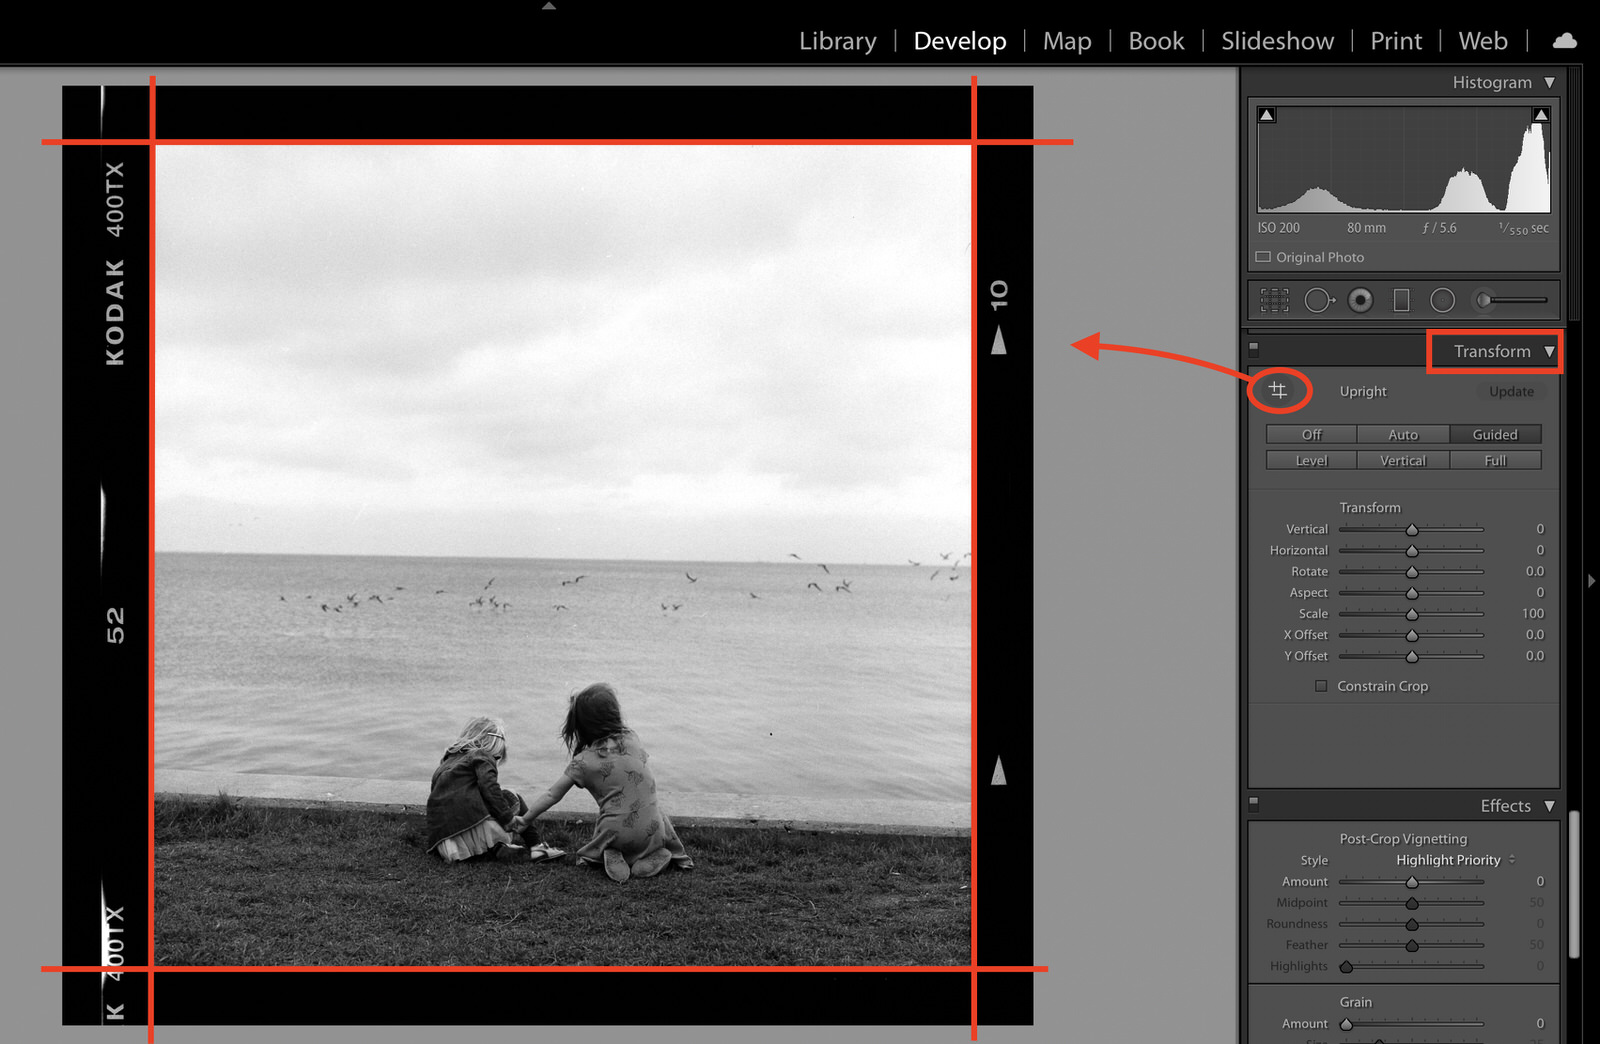
Even if you take special care to have your film perfectly in plane with your DSLR scanning setup, there will still likely be a small amount of perspective distortion. You can easily correct this using Lightroom's Guided Upright Tool. Just use the tool to set up lines along each border, and the tool will correct the distortion.
SPOT REMOVAL
Shortcut: Q
Lightroom’s Spot Removal tool is perfect for removing small amounts of dust from your scan (and if you’ve been careful with your setup, hopefully you don’t have much dust to begin with!). You can access it quickly by hitting the “Q” key, and then use the “[” and “]” keys to make the removal brush smaller or larger. The algorithm works great for a few simple spots, and 99% of the time it is all you will need. But if you have LOTS of dust or complex scratches, you will be better off using Photoshop’s healing brush tool.
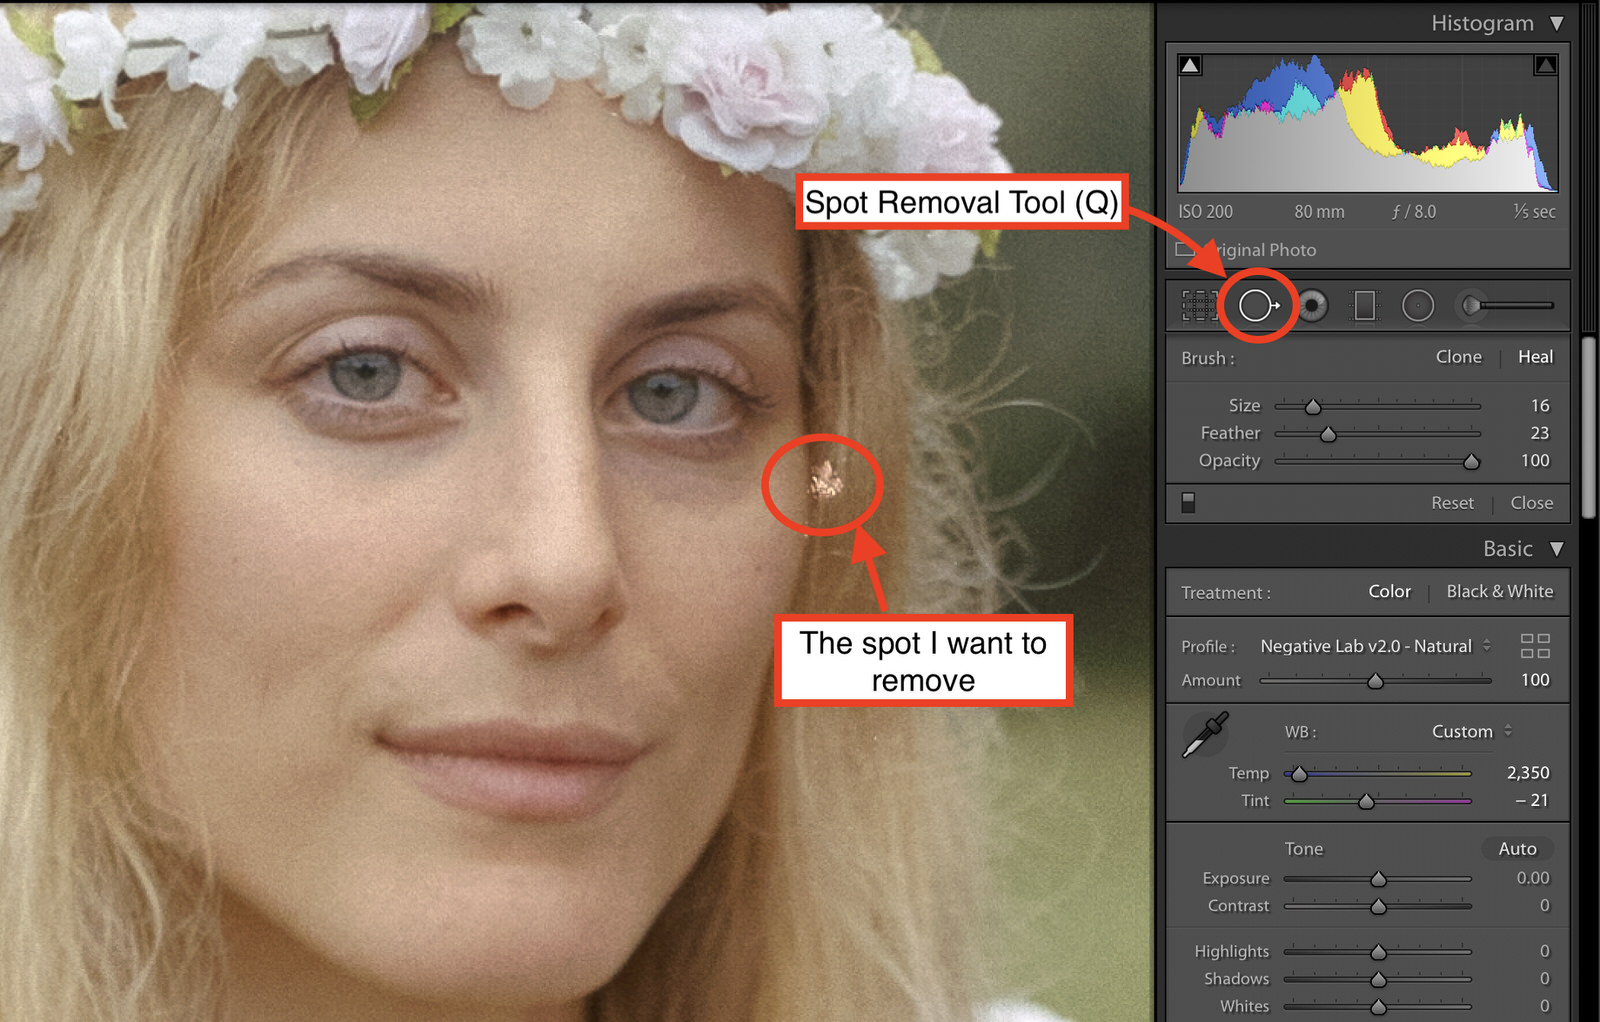
Lightroom's Spot Removal tool handles simple dust and scratches quite well. And it's non-destructive, meaning you can always re-adjust. Here, you can see a small area where the film has been damaged. So first, I will open up the Spot Removal tool (hitting "Q" or selecting the icon) and then adjust the size of my brush to be just larger than the area I need to fix. **NOTE: The selection is much more sensitive that Photoshop, so I typically zoom in to 3:1 and try to make a very precise selection.**
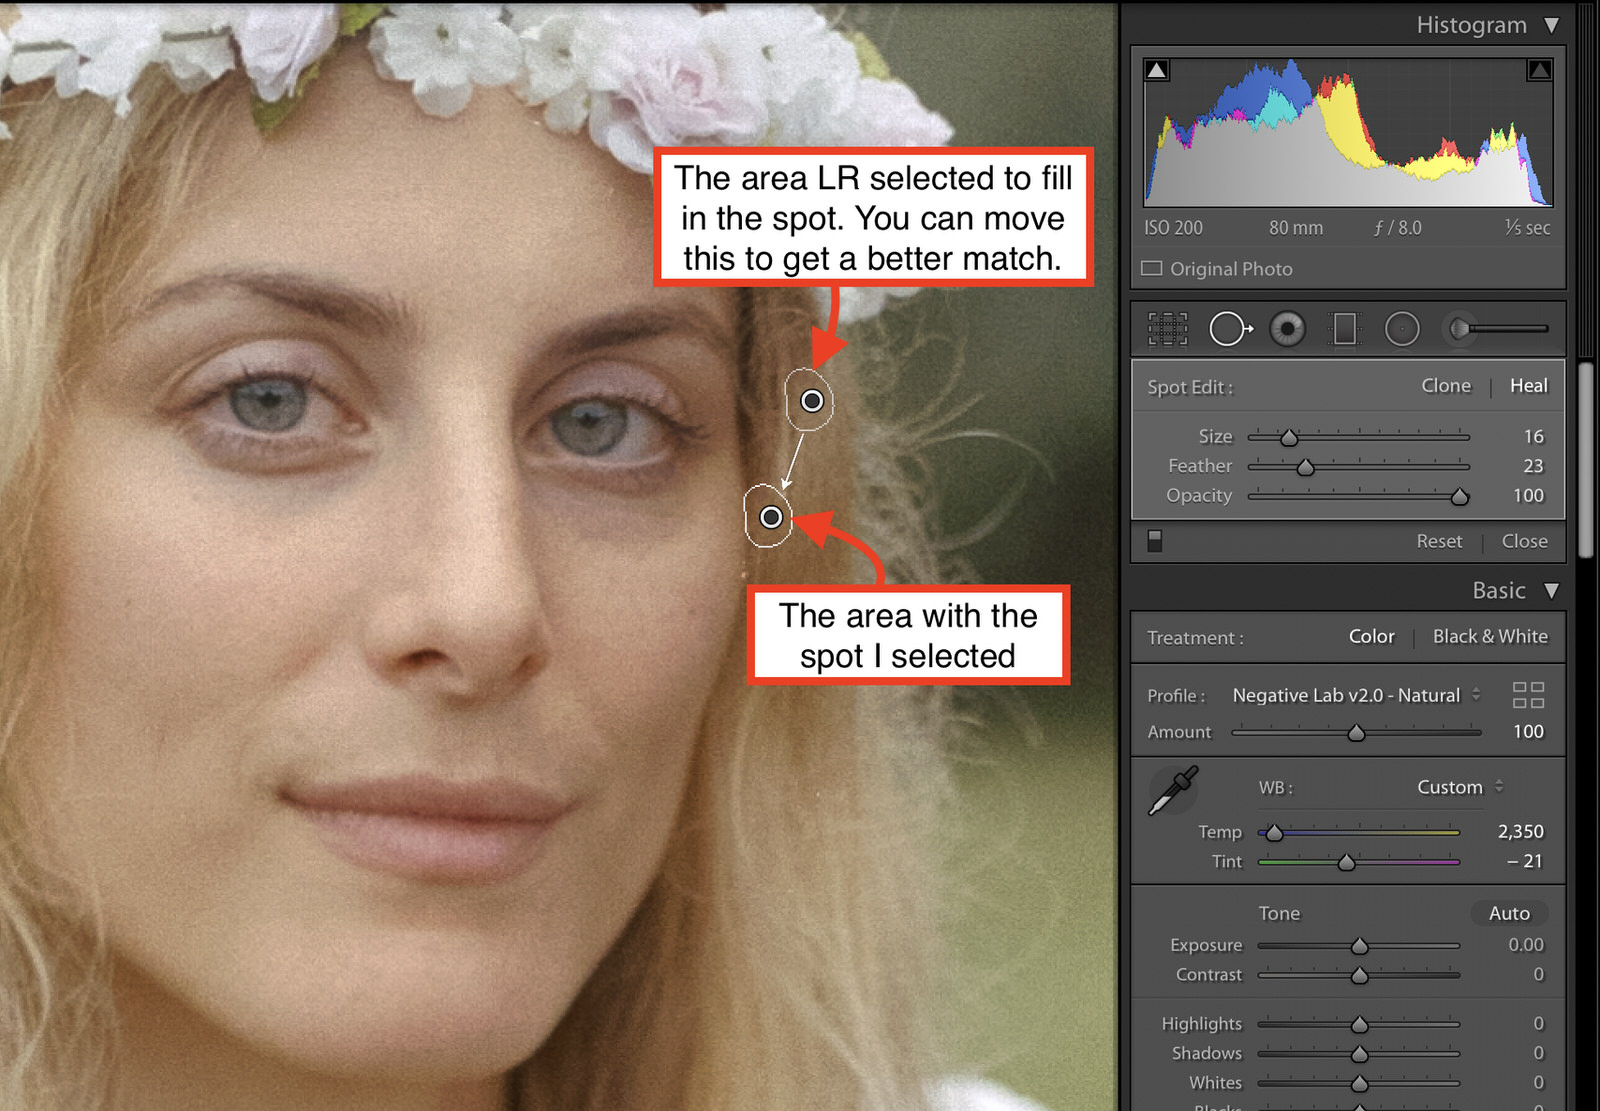
After making my selection with the Spot Removal Tool, Lightroom will try to find a matching area in the image to source the correction from. You can move this fill area to try to get a better match. You can also move your original selection area, and adjust the opacity to find the perfect blend
Spot Removal Tips:
- Use the “Q” key to bring up the spot removal tool. When you’re done using it, hit the “esc” key to dismiss it.
- Precise selection matters more with this tool than with Photoshop’s healing brush.
- Zoom up close and make your selection to be just larger than the spot.
- If you aren’t happy with the correction, try moving the fill area to a closer match.
- If you have more than 5 spots to correct, or long scratches that go across image elements, you will be better off using Photoshop’s healing brush.
GRADUATED FILTERS
I find that the local adjustment filters (like the graduated filter and the radial filter) can also be very helpful in some situations. You can use the Graduated Filter tool (M) to quickly fix a light leak. Just drag the graduated filter over the light leak, and then carefully adjust the exposure of the filter until the leak is cancelled out. The brilliant part is that because you are working against the original negative, this will fix both the exposure difference AND the color difference.
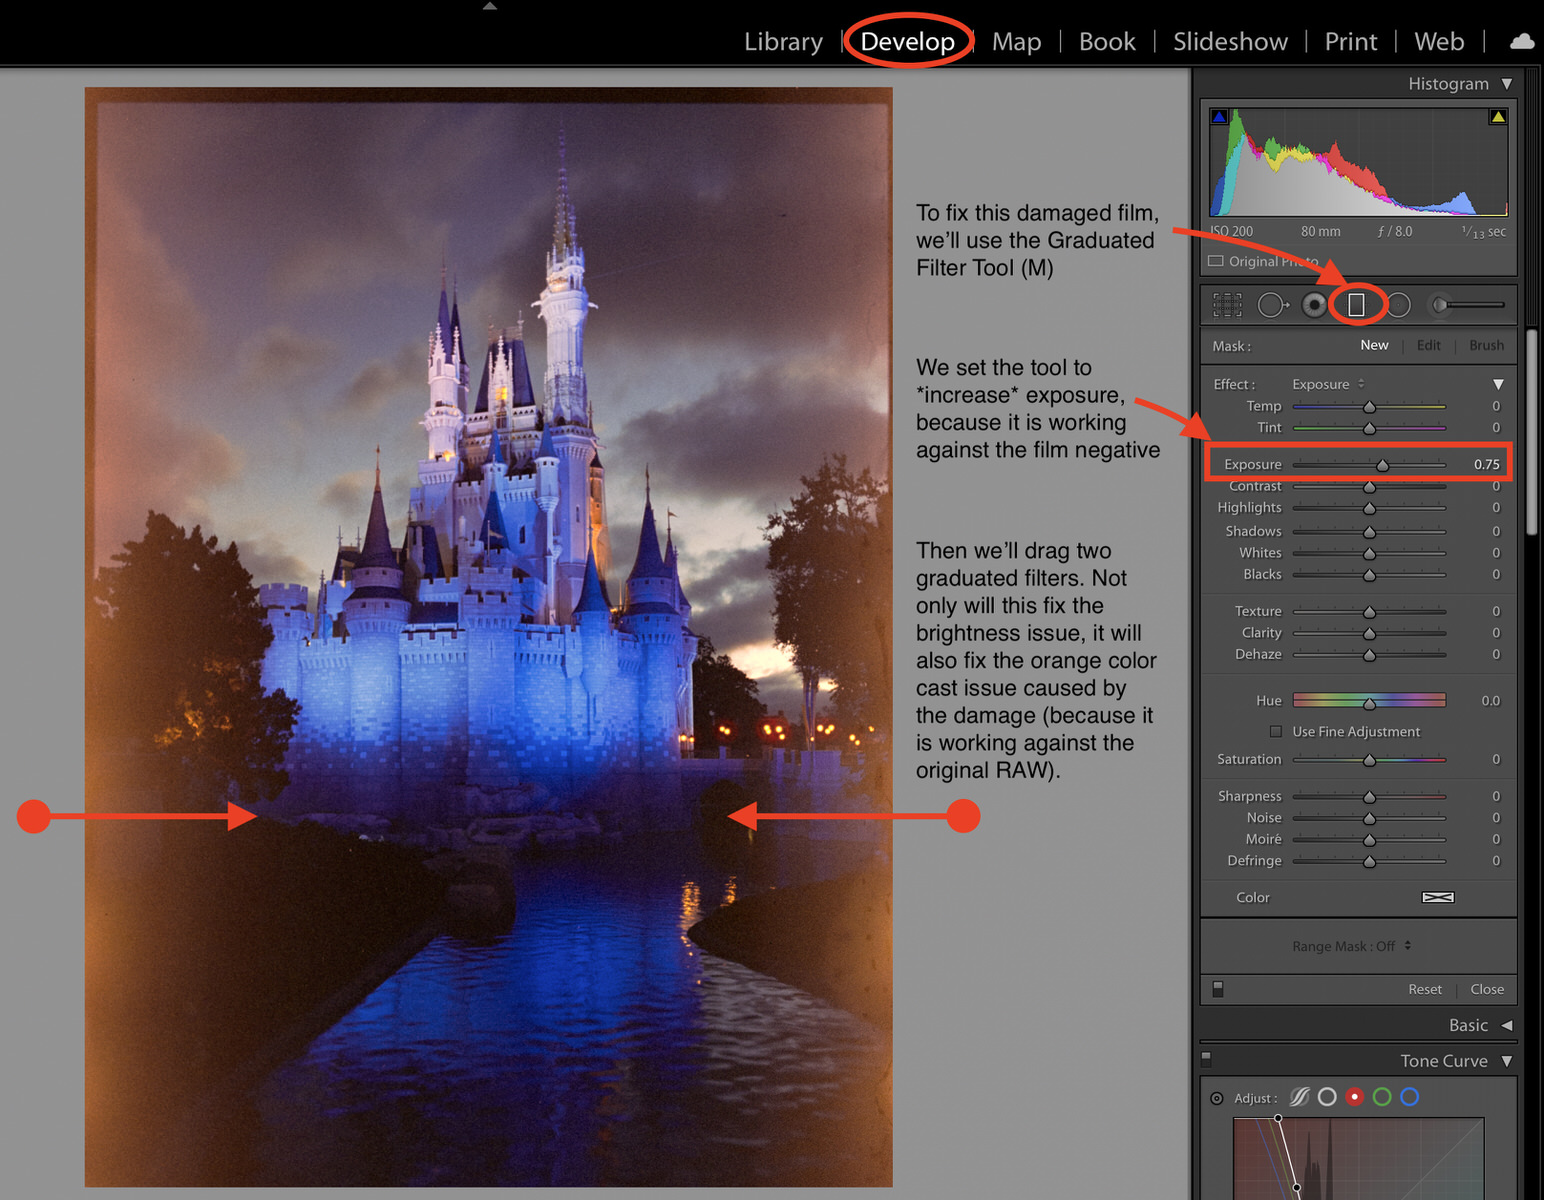
In many cases, orange "light leaks" like this are actually the result of a poor setup. But here, looking at the negative itself with my bare eyes, I could see clear signs of damage (maybe humidity related). Since there was nothing I could do in setup to fix this, the best solution is using one of Lightroom's local adjustment tools to selectively fix. Fortunately, because you're still working against the original RAW negative file, it's a pretty simple fix (it would be much more difficult to fix if I only had the finished converted file).
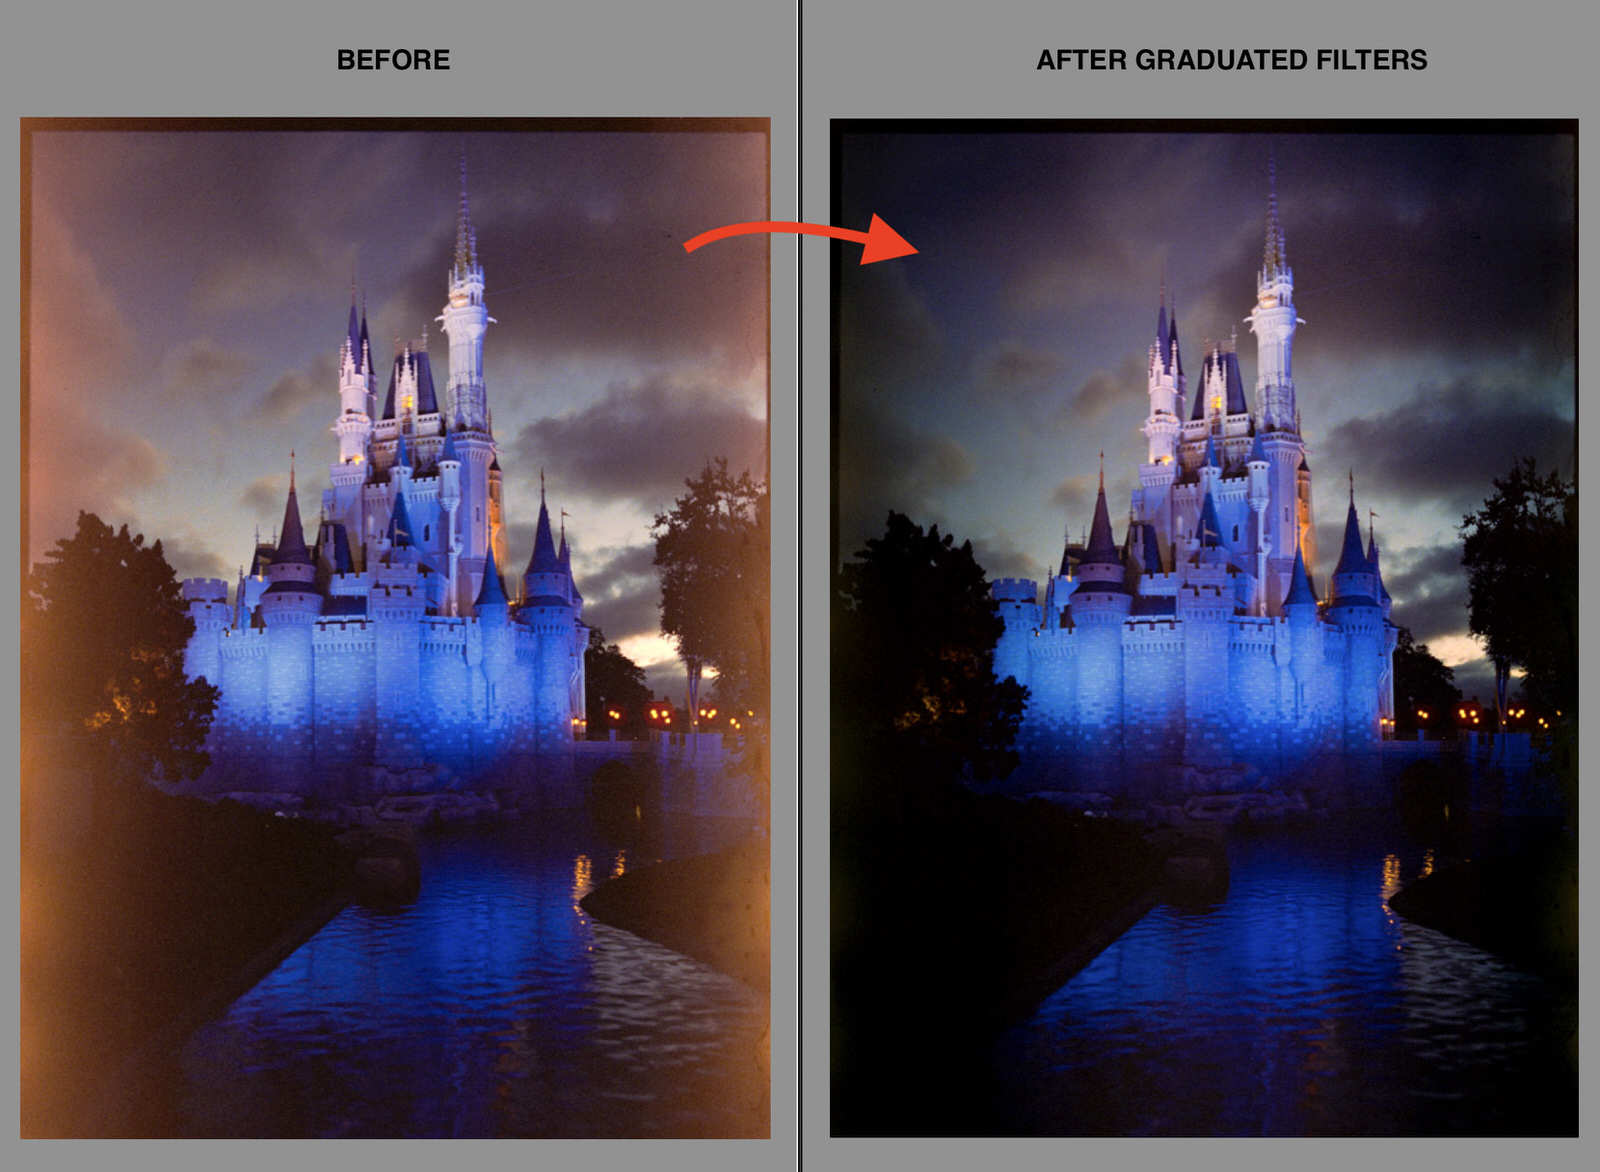
It's almost magical how easy this was to fix. By just using graduated filters, with just an *increased* exposure, it solves the underlying issues beautifully.
Another great use of the filter is to change the sharpness or texture of just some areas. For instance, if I want to soften just skin tones in an image, I can use the Adjustment Brush over skin, then refine it using a color mask so that just the skin tones are selected, and then remove a bit of texture. Or use a graduated filter over the sky, set a color or luminosity mask, and then remove texture from the sky. This is a powerful (and fun) tool!
PANO MERGES
Another great feature of Lightroom that I use often is for panoramic merges of multi-shot digital camera captures to get more detail out of the shot. When I’m working with medium format negatives, I’ll often take two photos of each negative with about 25% overlap in the middle. Then, in Lightroom, I’ll select the two raw images and run “Photo > Photo Merge > Panorama”. (I find that I usually get the best result in the pano settings if I set the pano mode to “Perspective” and push up “Boundary Warp” close to 100%.) It is also crucial if you do this that your original captures are perfectly flat and perfectly parallel to your setup.
To get more detail with my camera scanning setup, I captured each frame in this XPAN roll as two shots, with about 30% overlap. Now, in Lightroom, I'll select these two un-edited RAW files and merge them into a new RAW file.
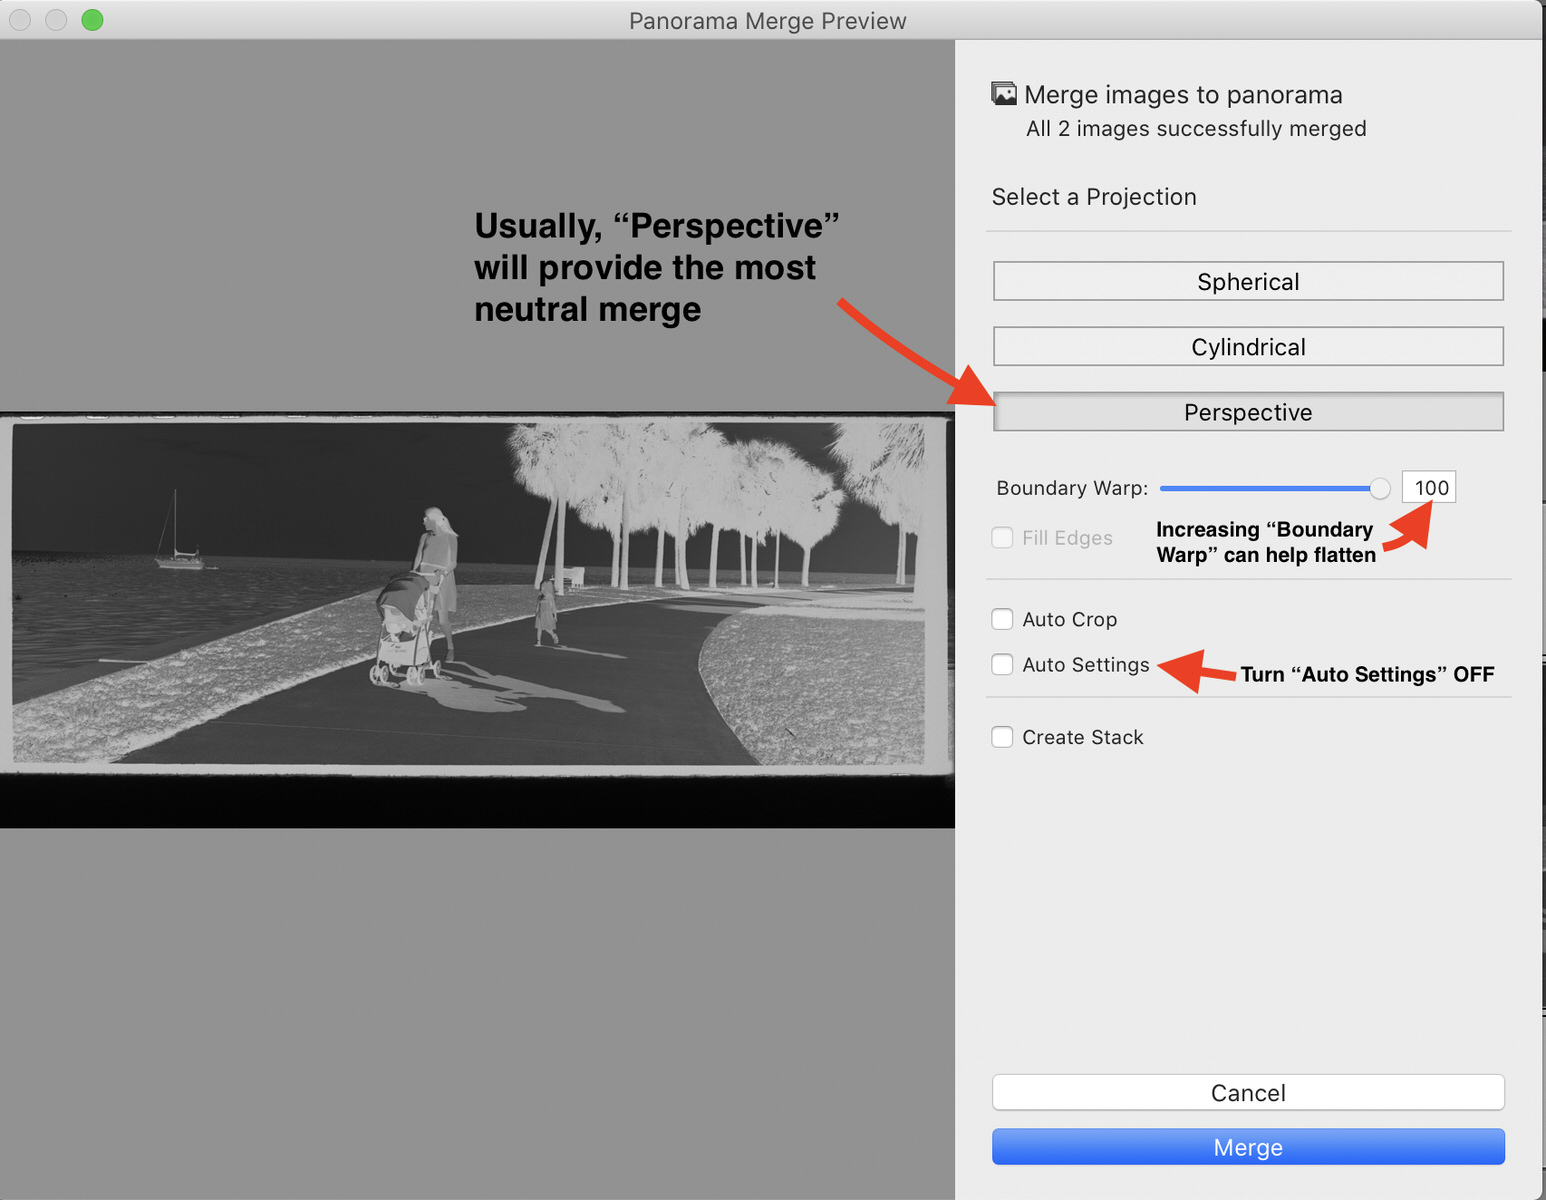
With the two shots selected, I select "Photo > Merge > Panorama" from Lightroom's menu. Here are the settings I typically use to merge, but you may need to experiment a bit, especially with the "Boundary Warp" setting. It's extremely important that your captured shots are flat and parallel to your camera, otherwise you will get distortion. There are also some diminishing returns if you try to stitch together many shots at once. I typically stick with 2 or 3 shots, and it works great!

After the merge, you can then use Negative Lab Pro on the resulting RAW DNG file. If you find that there is still some perspective distortion in your merge, you can use the Guided Upright Tool (Shift + T) to correct it.
The coolest thing about this feature is that Lightroom can merge together RAW files and make an output that is still RAW. If you plan on doing this, I recommend doing it early in your process (before using Negative Lab Pro), and then use Negative Lab Pro on the resulting, merged DNG RAW file. But you can also use Negative Lab Pro first on your negatives - just use the “sync scene” feature to make sure you are using the exact same conversion across all the images to be merged. Also, if you have converted the images first before merging, just note that the resulting merged DNG will also not have the underlying Negative Lab Pro metadata (so if you open Negative Lab Pro on the merged DNG, it won’t know it has already been converted). What you need to do in this case is to use the “sync scene” feature to bring over the image analysis from one of the original individual photos over to the merged photo. After doing this, you will be able to edit it normally in Negative Lab Pro.
You can also batch together many separate pano merges at once. Just group together the images you want to merge (select the images you want to merge, then hit “command + g” to turn them into their own group). Once all of your multi-shots for each frame are grouped together in this way, you can run “Photo > Photo Merge > Panorama” on the entire roll, and Lightroom will merge together each group.
Tips on Pano Merges:
- When doing multi-shot stitches with a DSLR scanning setup, it’s crucial that your film is perfectly flat and perfectly parallel to your digital camera setup. You can use a mirror to check and make sure your camera is perfectly in plane. With the mirror on your scan surface, your lens should be reflected back perfectly in the middle.
- Multi-shot stitches are also more sensitive to uneven light (because it will create small variations between shots), so it’s important to work out any lighting issues with your setup before attempting a multi-shot stitch.
- I recommend starting with a 2 or 3 shot stitch. Any higher, and it increases the chances something will go wrong during the merge.
- If using Lightroom’s pano merge, I prefer to do the merge FIRST and then convert the merged DNG with Negative Lab Pro. It’s just simpler this way.
- If you prefer to use Photoshop or another program to stitch your shot, first convert and edit one shot Negative Lab Pro, then use Sync Scene to bring the exact same conversions to your other shots of the negative. You can then export all your shots to Photoshop and merge there.
ENHANCE DETAILS
(LR Classic only)
If you’re a pixel-peeper, this one is for you (especially if you use a Fuji with an X-TRANS sensor to digitize) “Enhanced Details” uses a more robust algorithm for a process called “de-mosaicing.” Basically, de-mosaicing is taking the arrays of red, green and blue receptors on your camera sensor, and turning those into specific pixels. There is a lot of magic that goes on here, and historically, Lightroom has struggled with X-TRANS arrays (which is a more complex array pattern than typical Bayer arrays). Lightroom users have often complained that some of their X-TRANS RAW photos end up with “worm-like” artifacts, or a “painterly” sort of effect.
Anyway, at least for me on my Fuji XT2, using enhanced details makes a world of difference, and I run this as soon as I import new captures. Not only does it eliminate the “wormy” artifacts that can appear in textures and edges, but it also improves color accuracy, particularly of very small, color objects.
This will not be like the TV Crime Show “enhance” options, where you can finally make out the license plate of the criminal. It’s much more subtle.
Here’s a quick comparison (blown up to 200% to make it easier to see the difference, although it still may be hard to see).
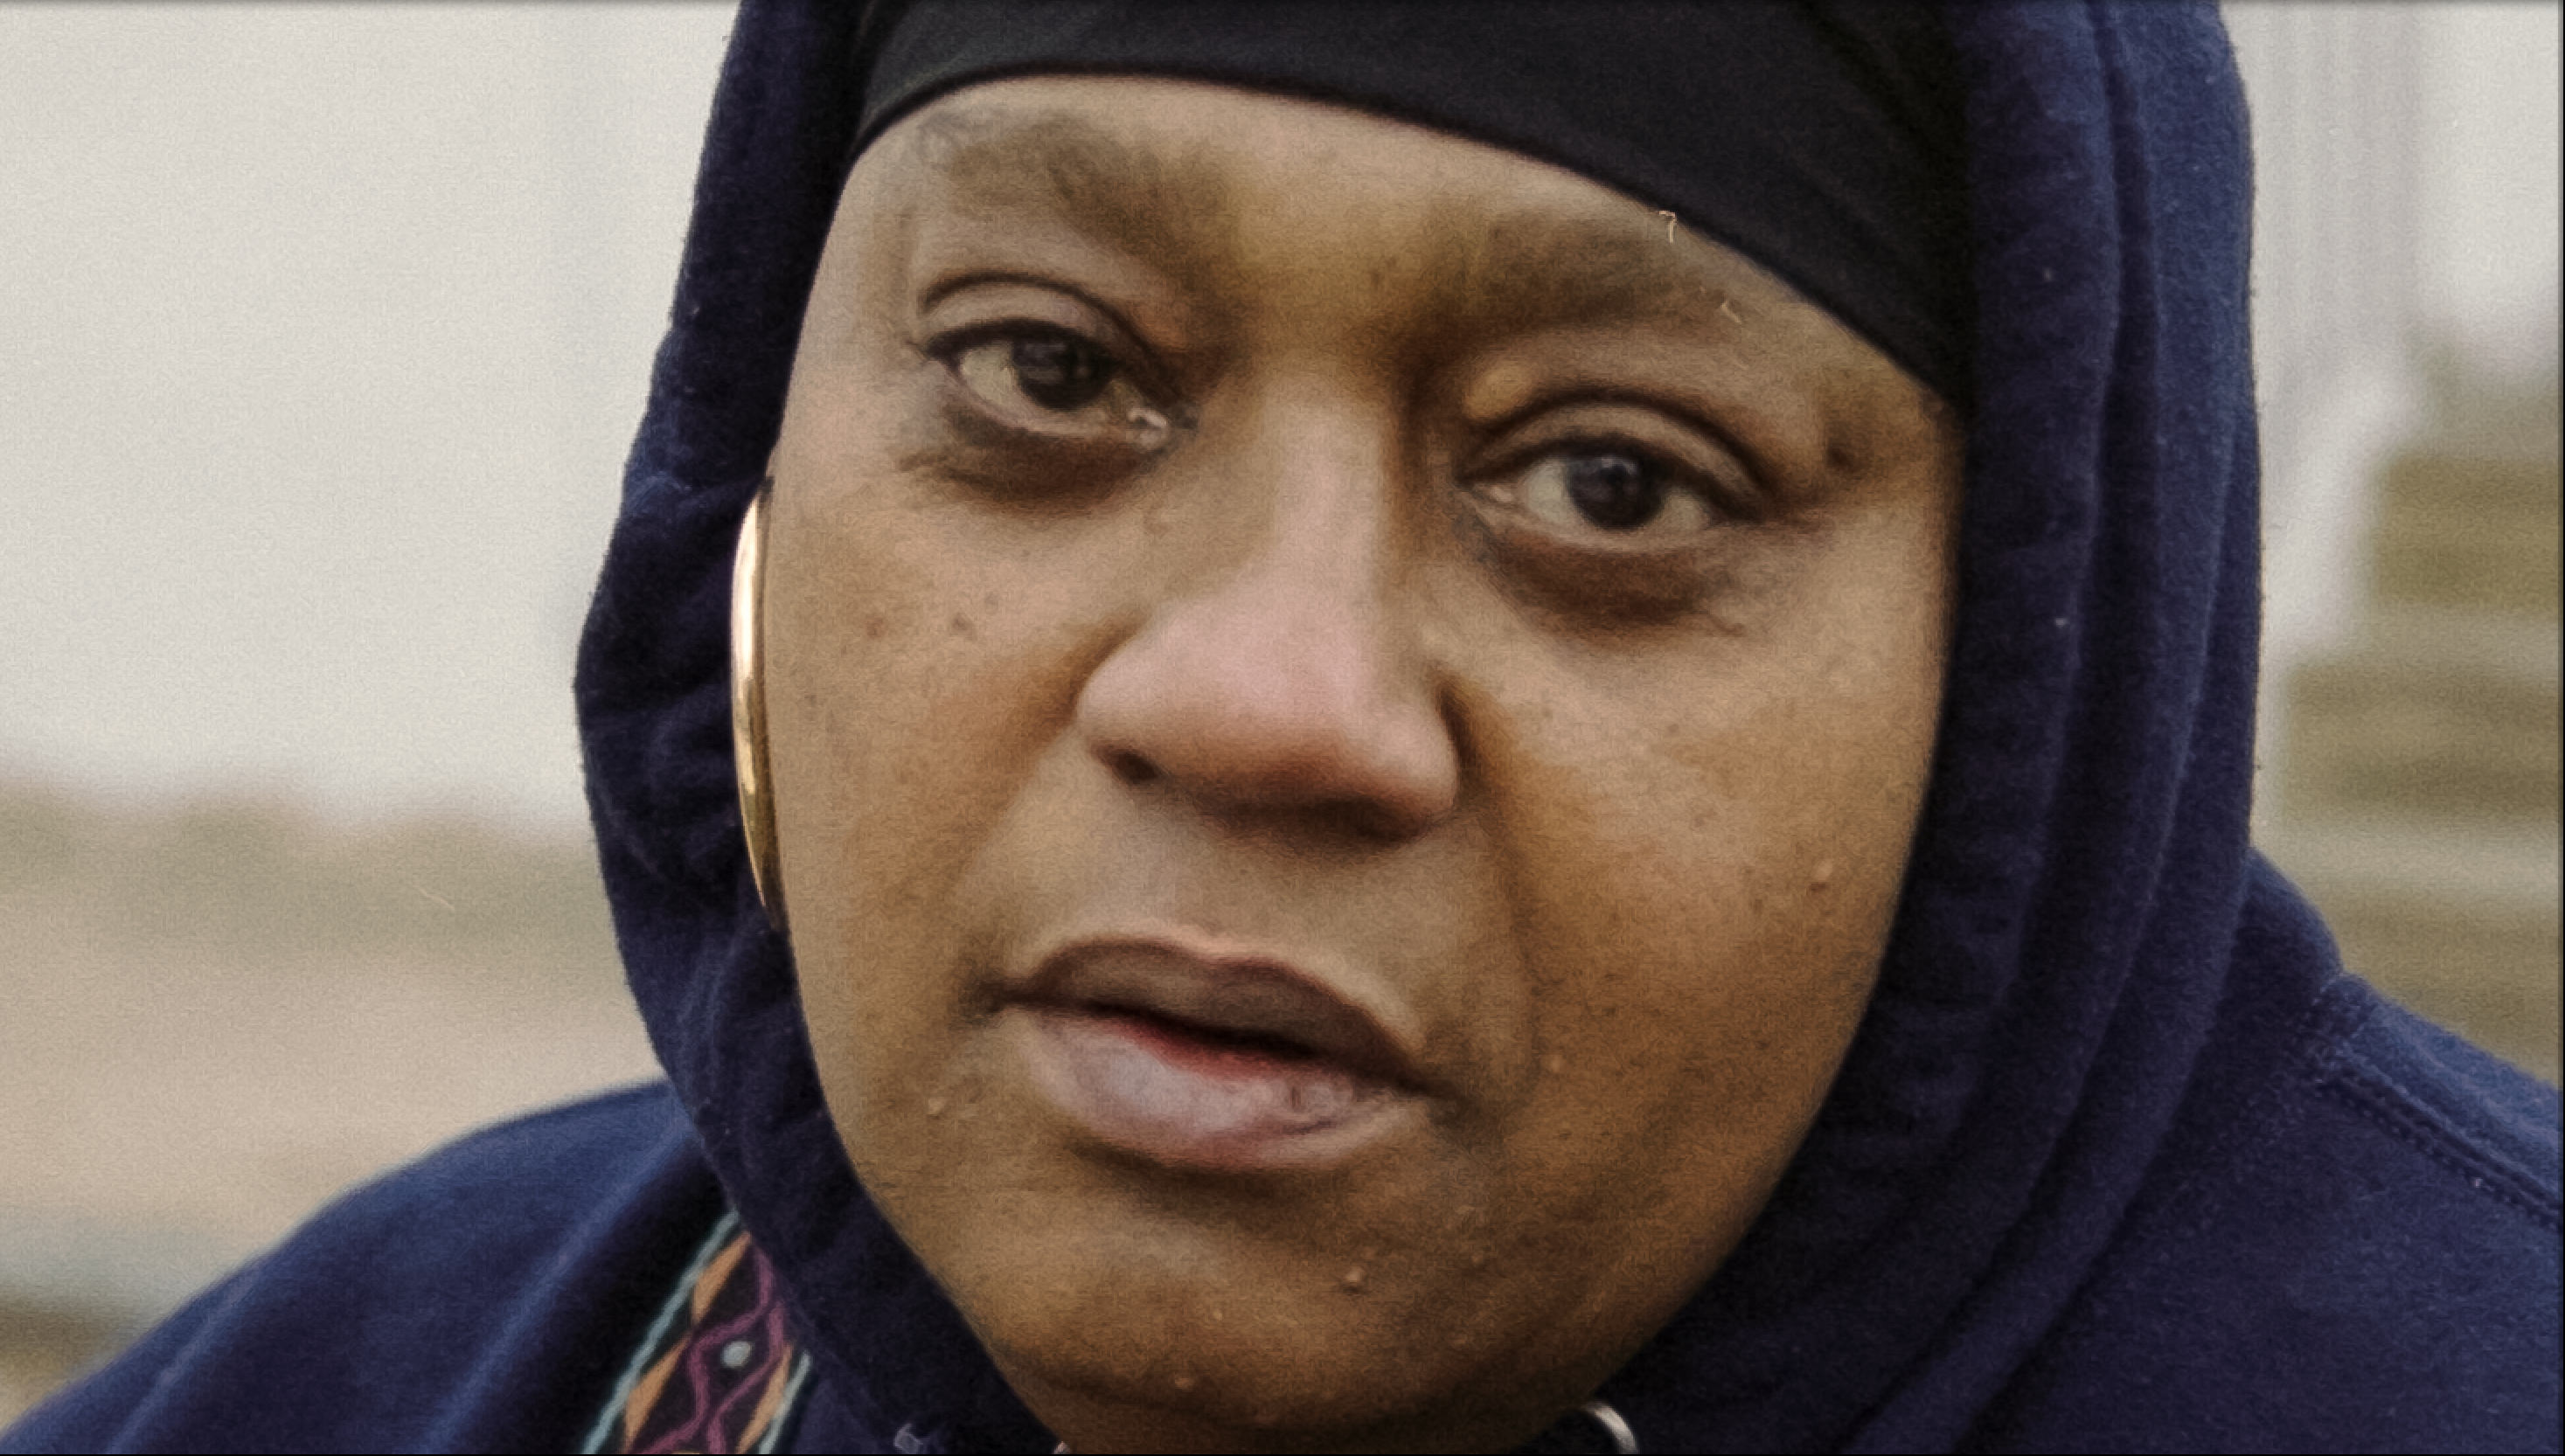

LEFT: The original ".RAF" file in Lightroom. RIGHT: After running "Photo > Enhance Details" in Lightroom. A few differences to look for: look at the subtle improvements to the texture of her blue hoodie. Look at the improved richness of color, especially in the shadows of her lip, her gold earrings, and the colorful strap on her shoulder. If you look close enough, you may also notice a tiny bit of "painterly" effect on her nose in the non-enhanced version, where the grain seems to follow the curvature of her nose as if painted on. It's subtle in this case, but "enhance details" makes the grain appear much more consistent and natural here.
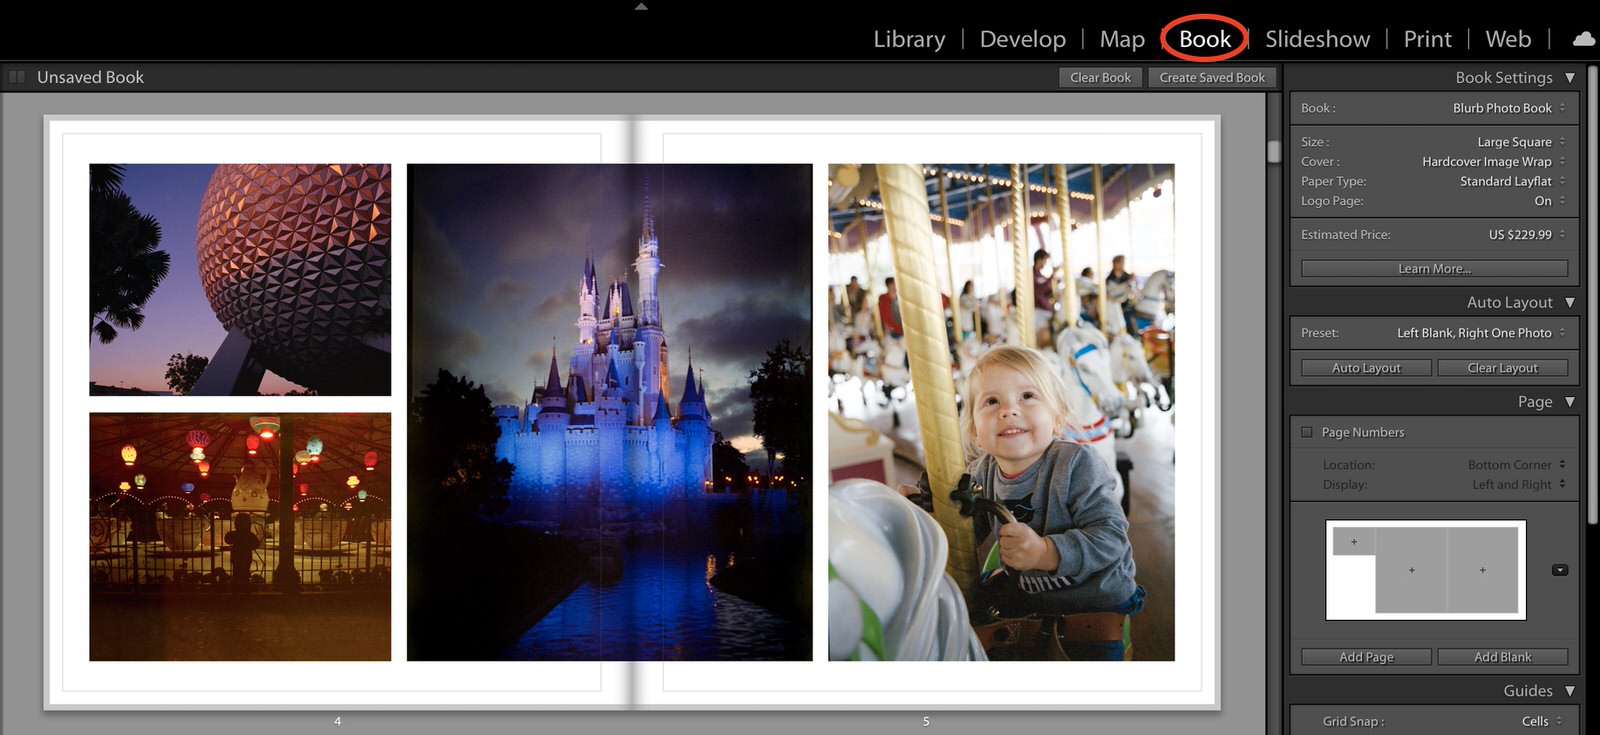
THE BOOK MODULE
Ready to make your own zine? Lightroom Classic’s included BOOK module is killer. There is a lot of advantage, I think, to being able to make your books directly with your RAW files. When you put your images into a book layout, it’s often easier to see small tweaks you need to make to the image’s tonality or color balance. When this happens, you can just switch back to the “Develop” module in Lightroom, open Negative Lab Pro and make those tweaks to your RAW negative file, and then hop back over to the Book module and those changes will be reflected!
OTHER PLUGINS
Lightroom has the best plug-in architecture of any RAW processor (it’s not even close). That means there’s a whole host of other awesome plugins you can use with Lightroom and Negative Lab Pro! Here are a few of my favorites:
LR/MOGRIFY 2
This is a “post-process” plugin that gives you a whole bunch of powerful tools you can use in the export window. I particularly like using the “unsharp mask” filter during export. I find this gives me more control and better results than the post-process sharpening that is the default in Lightroom. If you like the look of borders around your image (for instance, for posting to Instagram), you can also do that really simply in LR/Mogrify 2. It’s free to use, but if you want to use a filter on more than 10 images at once, you have to make a donation.
Get LR/MOGRIFY 2
Storyboarder
Storyboarder is a Lightroom plugin that allows you to create a “Storyboard” of images. I use this to make “contact sheets” of my rolls. It gives you a lot of control over exactly how you want your contact sheet to look. It’s free to try. The trial version limits the dimensions of the individual images to 100 pixels, but you can unlock this with a donation.
Get Storyboarder
Run Any Command
From the legendary plugin developer Jeffrey Friedl, this is a powerful tool once you know how to use it. Using this tool does require some advanced knowledge of working with command line statements (like you’d make in “terminal” on mac, or “command prompt” on Windows) and working with command line tools (like exiftool, imagemagick, etc.). But if you understand how to use this, you can make some very powerful actions. For instance, I wanted to create “Carousel” type posts on instagram (where an image is split into multiple images, but appears seamless when scrolling right on Instagram) and I was able to make a simple command to do this for me automatically!
Get Run Any Command
Those are just a few plugins that I use! But if you have a specific need, chances are someone has made a plugin for it!
Positive Copy Tips and Tricks
By creating a 'positive copy', you can make Lightroom's tools work exactly as they normally would on a digital file
What if you want to use Lightroom’s tools as if you were just working on a normal image? There’s an easy way to do that with Negative Lab Pro. You just need to make a “positive copy.” Lightroom will then work against that positive copy just as it would on any file.
Before we look at how to do that, my advice is that you will often get better results using the tone and color adjustment tools in Negative Lab Pro on the original raw. The tools in Negative Lab Pro are designed specifically to work naturally with film. For example, the “brightness” control in Negative Lab Pro is a special “gamma” curve that is made for use with film. And the color balance tools use independently balanced logarithmic curves in each color channel, that should provide more natural, film colors than using the color balance tools directly in Lightroom. But that said, I know that many users just want to be able to use Lightroom’s normal controls to finalize an image and that is perfectly fine, too!
Creating Positive Copies From Inside Negative Lab Pro
The first way to create a positive copy is from within Negative Lab Pro itself.
- When you are in Negative Lab Pro, just select the “Make Copy” box before hitting “Apply.”
- You can choose to make a TIFF copy or a JPEG copy. The TIFF will be a 16bit per channel file, and the JPEG will be an 8bit per channel file. The TIFF will give you more latitude for edits, but in most cases, the JPEG should have enough latitude since the heavy lifting has already been done during the initial conversion.
- You can also choose to “stack w/photo” or place the copy in a subdirectory.
Once you’ve made the positive copy, just note that you may not initially see it. You need to be viewing the containing folder in Lightroom to see the copy (it won’t show up if you are in the “Last Import” or “Collection” views).
Creating Positive Copies without opening Negative Lab Pro
In some circumstances, you may want to create positive copies without opening up Negative Lab Pro. You can do this quickly using contextual menus.
- Select the image(s) you want to create positive copies on
- Then Right-click > Export > NLP - Positive Copy - TIFF (or JPEG)
Customizing Positive Copy Options
You may find that you want to have greater control over how and where the positive copies are made. This is possible to do now in Negative Lab Pro, but takes a little bit of setup.
- Select an image, and go to File > Export
- From the left pane, select the preset for “NLP - Positive Copy - TIFF”
- From here, you can customize all the export settings you want – both NLP metadata settings (which we’ll look at later) and regular export settings (like file naming, export location, color space, etc)
- IMPORTANT - now you need to SAVE your new export preset. Once your settings are how you want them, click “add”, then enter a preset name and folder.
- You can now access this anytime by right-clicking an image, selecting export, and then selecting your custom export preset.
Generally, you will want to try to get as close as possible to your final image using Negative Lab Pro and the original RAW data, since this has the most leeway for adjustments and change (and it behaves more similarly to the results you would expect from pro lab scanner). To see just the TIF copies in your library, use the Library Text Filter (press the \ key to toggle it in the Library module), and search for any field that contains the text “positive”. To work on just the original files, search for “doesn’t contain” on the text “positive”